Resolving Common Toilet Seat Problems
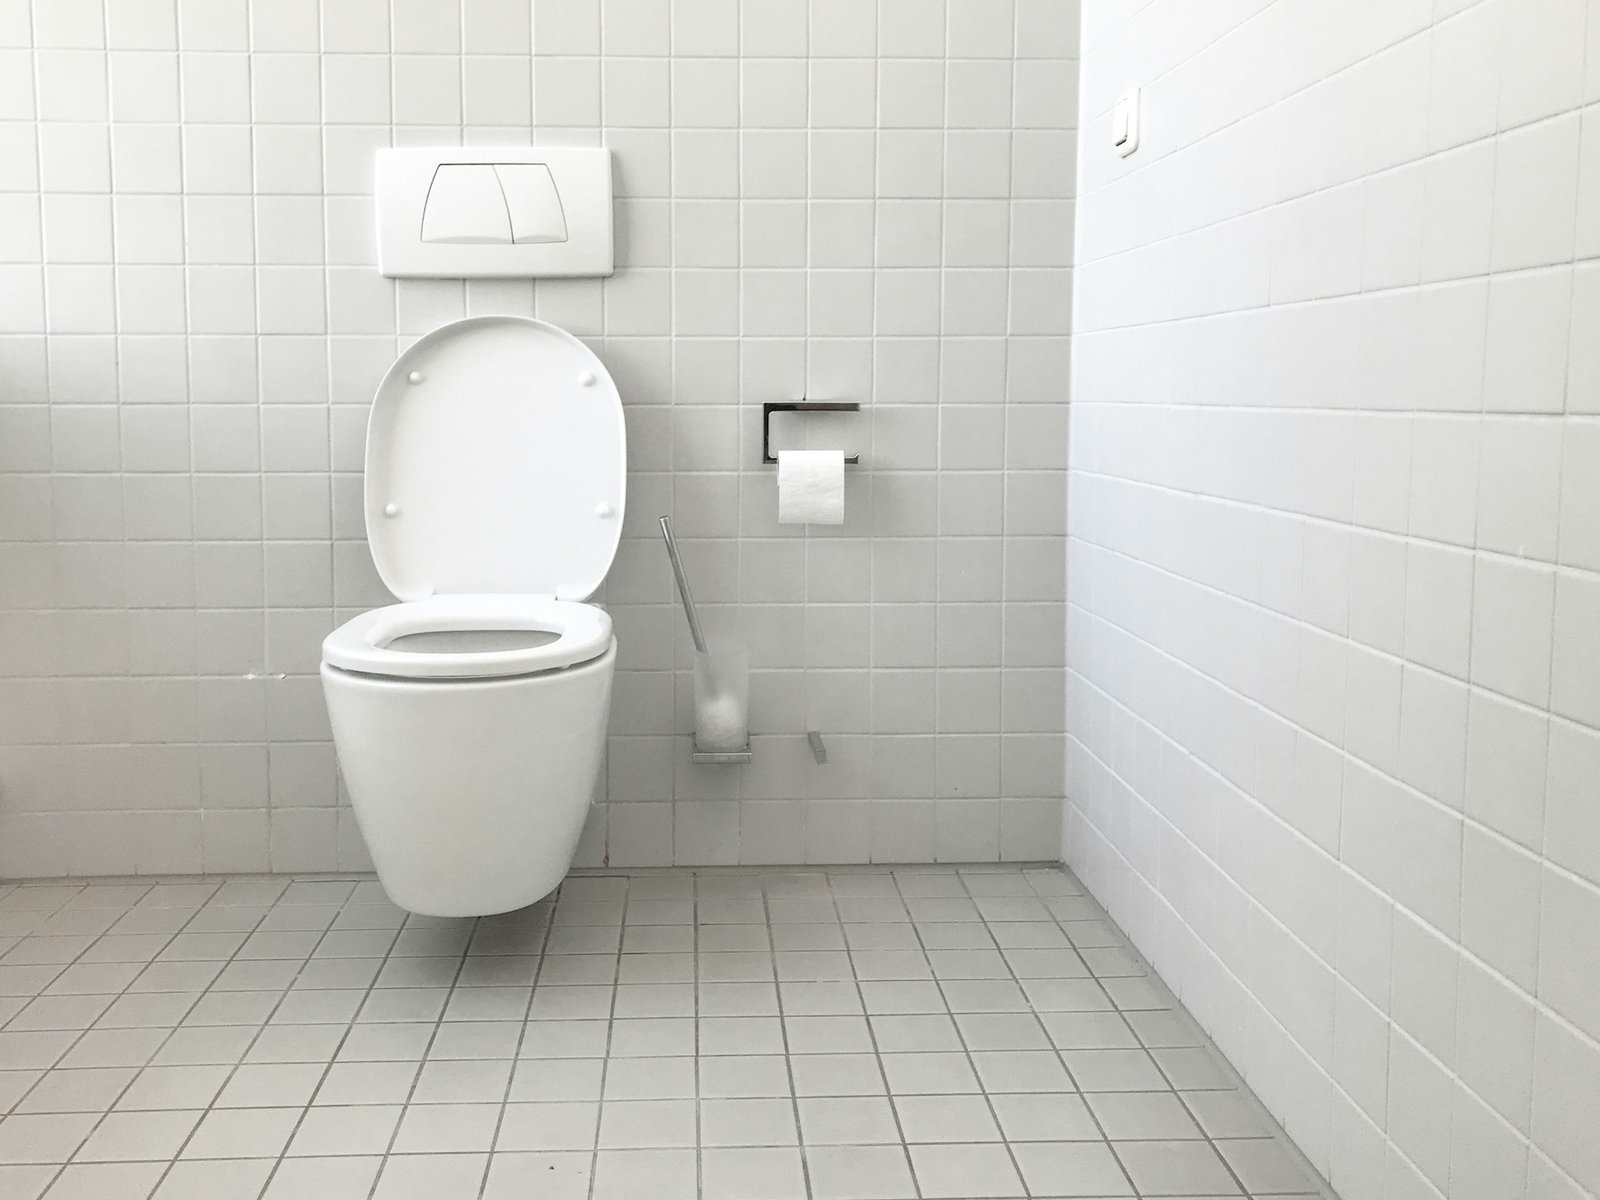
Does your toilet seat keep giving you troubles? You’re not alone! Many people find themselves dealing with wobbly seats, stains, cracks, and other irritating issues that seem to pop up out of nowhere. It might not seem like a big deal, but ignoring these problems can turn a minor annoyance into a major headache. Picture this: you’re hosting a family get-together, and your toilet seat decides to play a wobbly game halfway through the evening. Not fun, right? Dealing with toilet seat problems promptly is key to keeping your bathroom functional and comfortable. These small issues, if left unattended, can lead to bigger complications that take more time and money to fix. Plus, who doesn’t feel better when everything in the bathroom is in top shape? Let’s look at some common toilet seat troubles and how you can handle them quickly and efficiently. Wobbly Seats One of the most frequent and frustrating toilet seat problems is the wobble. A wobbly seat can be a bit unsettling. But what exactly causes it to become loose and unsteady? Often, it’s due to the frequent usage that loosens the bolts or the hinges being misaligned. Sometimes, simple wear and tear over time can cause it to shift from its original position. Tightening a loose toilet seat is usually straightforward and can be tackled with minimal tools and fuss. Here’s a simple way to fix it: – Locate the screws at the back of the seat. – Depending on the mechanism, you might need a flathead or a Phillips screwdriver. – Tighten the screws a little each time, checking the seat’s stability after each turn. – Make sure not to overtighten, as this could lead to cracking. Keeping a small toolkit in the bathroom can be handy. Having a screwdriver readily available makes tightening the seat whenever it starts getting loose a breeze. Adjusting the seat alignment when you first notice a wobble can prevent it from needing more serious attention later on. Regular checks can help ensure it stays firmly in place. Stains and Discoloration Stains and discoloration can make a toilet seat look old and unappealing. These issues often arise from minerals in the water, everyday use, or even the occasional spill. To keep your toilet seat looking fresh and clean, it’s important to tackle these stains effectively with simple everyday solutions you might already have at home. Start by using a mixture of baking soda and water to create a paste. Apply this paste to the stained areas and gently scrub with a soft sponge or cloth. This method helps to lift many surface stains without harsh chemicals. For tougher stains, a vinegar solution might do the trick. Let it soak on the stain for a while before wiping it away. Regular cleaning can prevent stains from settling in and keep the seat looking new. Preventive care is always a good approach. Wipe the seat regularly with a gentle cleaner to stop stains before they have a chance to form. Avoid abrasive pads or strong chemicals that might damage the surface. With consistent care, your toilet seat will maintain its fresh appearance for a longer time. Cracks and Breaks Cracks are another common issue with toilet seats, which can compromise the integrity and safety of the seat. Identifying these problems early means you can act before they get too serious. Small cracks might go unnoticed until one day you hear an unsettling sound when sitting down. The decision to repair or replace depends on the severity of the crack. Small surface cracks can sometimes be repaired with adhesive designed for bathroom fixtures, but it’s always wise to consider replacement when the damage seems significant. Replacing a cracked toilet seat might be the safest choice to avoid any unexpected breaks that could lead to injury. Safety should always be the top priority. Even a small crack might eventually lead to a failure under pressure, so don’t ignore any signs. Check your seat regularly for any wear and tear, ensuring that everyone in your household can use it comfortably and securely. Loose Hinges Loose hinges can be a frustrating problem, causing the seat to slide or move unexpectedly. This issue often arises when the screws or bolts securing the hinges come loose over time due to regular use. Fortunately, getting those tight and secure again is usually a quick fix with the right approach. To secure loose hinges, follow these steps: Open the seat and locate the screws or bolts. Use a screwdriver or a wrench to tighten them. A small turn each time is best. Check the alignment of the seat as you adjust to make sure it sits correctly. Periodic checks of the tightness can prevent the issue from recurring. Keep some basic tools handy in the bathroom for quick fixes like these. Regular maintenance of the hinges ensures that the seat remains stable, avoiding any sudden shifts that might surprise you or a guest. Persistent Squeaks Squeaky toilet seats can be quite annoying and can sometimes catch you off guard, especially in the middle of the night. The squeak is usually caused by the friction between the hinges and the seat. Addressing this problem doesn’t have to be complicated, and with a little attention, your seat can operate silently once more. Apply a small amount of lubricant like silicone spray to the hinges. It effectively reduces friction without causing any damage to plastic or metal components. Be sure to clean any excess lubricant to prevent attracting dirt. This simple fix can make a big difference in ensuring a quiet and smooth operation. Finally, routine inspections and minor adjustments of moving parts will help in maintaining a silent, smoothly functioning bathroom fixture. A little lubricant goes a long way in maintaining peace and quiet during those midnight trips. Keep Your Bathroom Functional and Comfortable Addressing these common toilet seat issues ensures your bathroom stays in top form. Regular checks and maintenance prevent minor problems from becoming bigger headaches down the
Why Your Toilet Is Constantly Running and How to Fix It
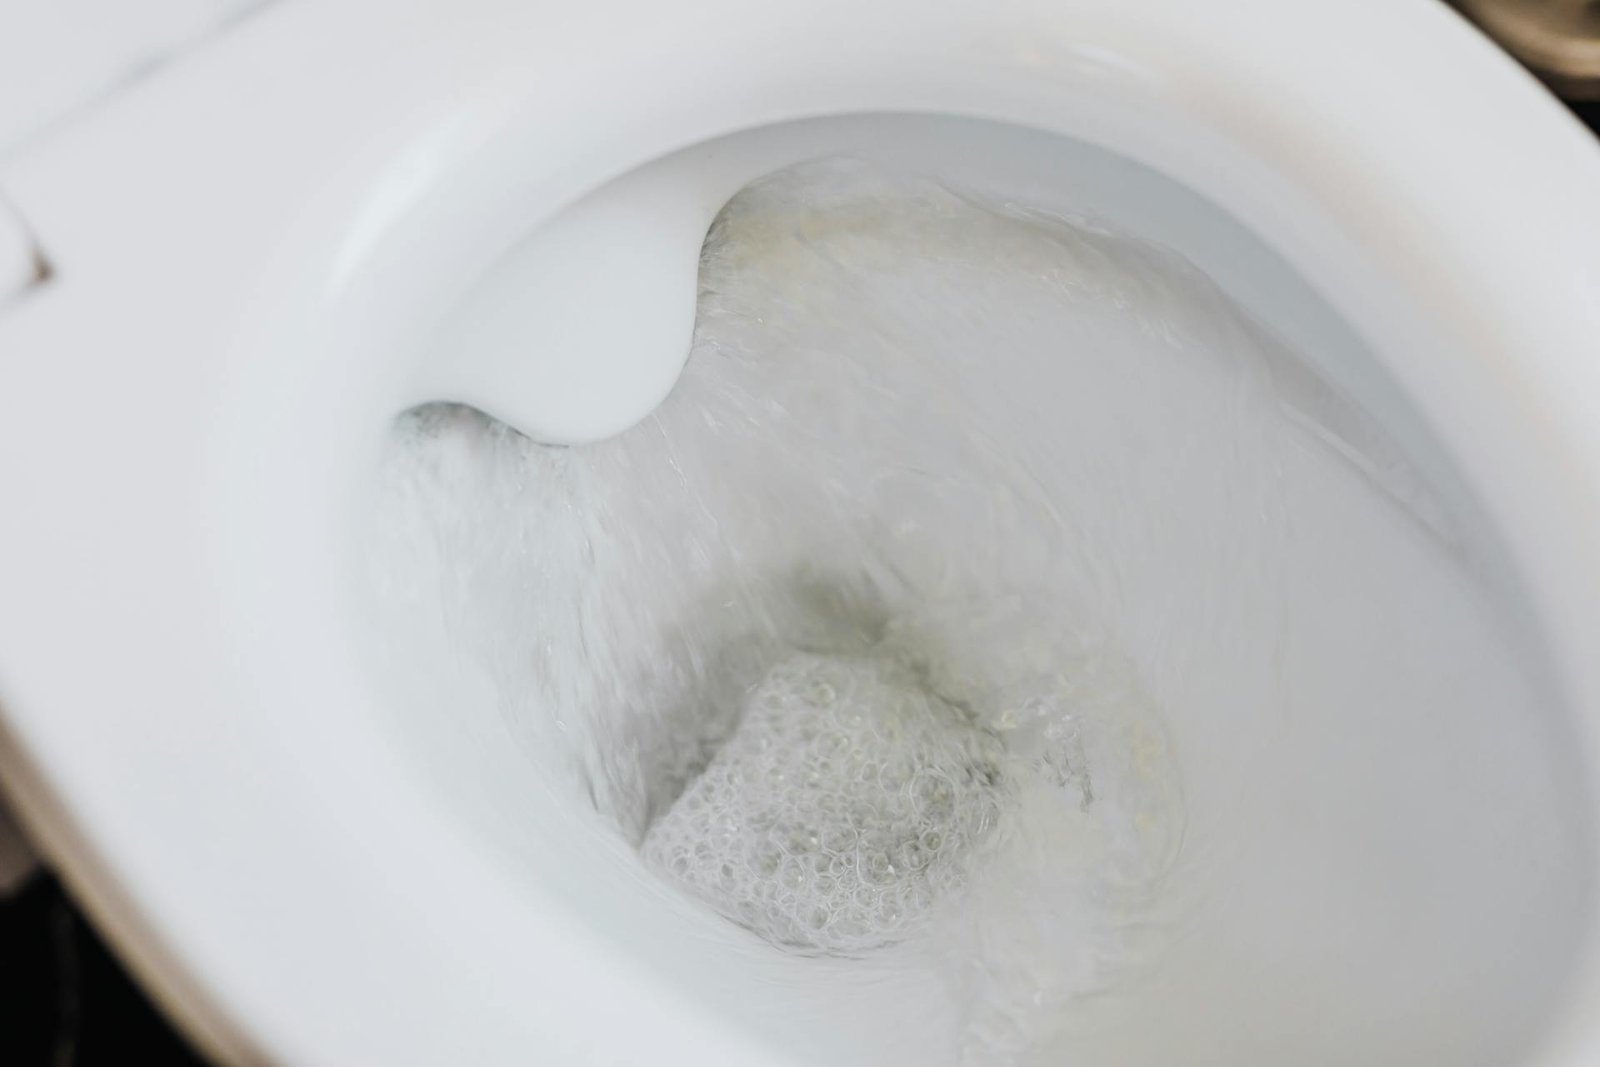
Hearing the sound of a toilet running constantly can be quite a headache. It’s not just the noise that’s bothersome but also the thought of all that water—and money—going down the drain. Many homeowners face this common issue. Leaving it unaddressed can lead to higher utility bills and unnecessary water waste. It’s a relief to know that understanding the root causes and sorting them out can often lead to easy and effective solutions. A continuously running toilet is more than an inconvenience. It can indicate various underlying problems that, if ignored, might escalate. Think of it as your toilet’s way of signaling that it needs a bit of attention. We’ll explore the typical causes behind this issue and guide you through the initial steps to help fix it. Keeping those water woes away might be simpler than you imagine. Common Causes of a Running Toilet A toilet that won’t stop running usually points to one of several common culprits. Knowing these can help in identifying where the issue lies, and some basic checks can often reveal the problem quickly. – Flapper Valve Issues: The flapper valve acts as a seal between the toilet tank and bowl. If it doesn’t create a proper seal, water will continuously leak from the tank. This might happen due to wear and tear, or the valve might be misaligned. – Fill Valve Problems: The fill valve controls the water level in the tank. If it’s not working right, it might keep filling the tank, leading to overflow through the waste pipe. This could be because the valve is malfunctioning, or the water level is set too high. – Overflow Tube Position: If the overflow tube is set too low, water will continuously spill into it, causing the toilet to run constantly. Ensuring that the water level is below the top of the tube can help prevent this issue. Understanding these common causes gives you a head start in solving the problem. It’s like having a checklist of suspects that you can eliminate until you find the real troublemaker. In the next section, we’ll guide you through the steps needed to fix these issues, ensuring your toilet returns to its quiet, efficient self in no time. Fixing a Running Toilet: Step-by-Step Guide Getting your toilet back in top shape can be a straightforward process if you follow some simple steps. The first step is diagnosis. A few careful observations can reveal what’s causing your toilet troubles. 1. Examine the Flapper Valve: Check if the flapper seal is tight. If it’s not sealing properly, it might need cleaning or replacing. Lift the lid and observe how the flapper operates after you flush. 2. Adjust the Fill Valve: If water continuously flows into the overflow tube, the fill valve might not be closing off the tank. Adjust the valve so the water stops about an inch below the overflow tube. 3. Check the Overflow Tube: Ensure the water level isn’t too high. If water spills into this tube, adjust the float level or lower the fill valve to stop it from overflowing. While tackling these steps, you may find it useful to see how each component should function. Online videos can provide visual guidance, making the process less daunting. Remember that some issues might need a professional touch if they aren’t resolved quickly or if you’re uncomfortable handling them. Preventative Maintenance Tips Once you’ve got your toilet running smoothly, keeping it that way is all about regular maintenance. Here’s how you can avoid future issues: – Regular Inspections: Check the functioning of the flapper and fill valve every few months to make sure they are working properly. – Replace Parts Timely: Parts like flappers and fill valves wear out over time. It’s often wise to refresh them every couple of years, even if they aren’t causing trouble yet. – Professional Check-Ups: Consider having a professional check your plumbing. They can spot issues you might miss and suggest improvements or repairs to keep everything running efficiently. By dedicating a little time to these tasks, you’ll save yourself a lot of hassle down the track. Plus, it’s nice to have the peace of mind that comes with knowing everything’s in good shape. When to Call a Professional Sometimes, despite your best efforts, problems persist. That’s when it’s time to bring in a professional. Here’s when you should consider making that call: – Persistent Leaks: If your toilet’s still leaking after your adjustments, the issue could be hidden. Professionals have the tools to diagnose and fix stubborn problems. – Unusual Noises: Strange sounds like gurgling or whooshing may indicate a problem with your plumbing system rather than the toilet itself. – Repeated Repair Failures: If you find yourself fixing the same issue constantly, there could be an underlying problem that needs expert attention. Professionals bring a wealth of knowledge and experience, ensuring that your toilet woes are truly resolved. You’ll save yourself the trial and error, knowing that your bathroom fixtures are in capable hands. Enjoy a Trouble-Free Bathroom Experience Fixing a running toilet not only brings peace and quiet but also ensures your bathroom is efficient and eco-friendly. By addressing the common causes and following simple maintenance tips, you can keep this fixture in top shape without much hassle. Your toilet might seem like just another part of your home, but when it’s working right, it’s easy to forget the convenience it provides. Handling these small repairs when they arise means you won’t be caught off guard when something bigger comes up. Enjoying a well-functioning bathroom makes life a bit easier, letting you focus on the more important things in life. With running toilets, quick fixes and regular maintenance ensure everything functions smoothly. To make sure your bathroom stays trouble-free, consider exploring our range of options. Discover more about toilets in Melbourne available at CARGO Bathroom & Kitchen. Find the perfect solutions to keep your home running efficiently and comfortably.
What Makes a Quality Bathroom Vanity Unit in Melbourne?

Keeping oak bathroom vanities safe from moisture damage can feel like a task, but it’s one worth investing in. When water seeps into oak, it can lead to warping, stains, and other issues that might turn your beautiful piece into a bit of an eyesore. By taking some time to understand how to protect your vanity, you will keep it looking fresh and new for years to come. Oak is a popular choice for vanities due to its classic look and durability. Yet, like all wood, it’s vulnerable when exposed to too much moisture. Wet areas, such as bathrooms, pose a real risk to wooden finishes. That makes it particularly important to take measures that will guard against damage. Let’s explore some effective strategies to help keep moisture at bay. Understanding Moisture Damage Moisture damage happens when water penetrates the wood, causing it to swell or warp. Over time, this damage affects both the appearance and the integrity of the vanity. In bathrooms, splashing water and the high humidity levels create an environment where moisture damage can easily occur, meaning vigilant care is needed. The signs of moisture affecting oak are unmistakable once you know what to look for. You might notice the wood appearing darker in certain areas, which could indicate water absorption. Warping or little bumps and ridges may signal that the wood is reacting to the moisture. Keeping an eye out for these signs will help you act quickly before a small issue turns into a bigger one. Effective Ventilation Techniques Good ventilation is crucial in helping to control moisture levels in a bathroom. Ensuring proper airflow helps reduce humidity, thereby lowering the chances of moisture damage to your vanity. Addressing ventilation issues doesn’t mean an entire remodel but rather some smart fixes that can make a big difference. Here are some practical tips for improving ventilation: – Install an Exhaust Fan: This device is key in removing excess moisture from the air. Make sure to use it every time you shower or bathe and let it run for a few minutes afterwards. – Open Windows: If your bathroom has windows, open them up when the weather permits to allow fresh air to circulate. – Consider a Dehumidifier: In particularly humid areas, a small dehumidifier can help maintain a comfortable moisture level. These strategies help to keep the air fresh and prevent the kind of damp conditions that are hard on wooden furniture. Sealing and Protecting Oak Protecting your oak vanity from moisture starts with sealing. This step creates a barrier, keeping water from soaking into the wood. The right sealant can prevent common issues like warping or dark spots that come from excessive moisture. You might think of it like putting on a raincoat before going out in the storm—it’s about being prepared for the wet environment. To seal your vanity effectively, follow these simple steps: 1. Clean the Surface: Ensure the oak is clean and dry before you start. Use a soft cloth to wipe away any dust or grime. 2. Choose the Right Sealant: Look for a sealant designed specifically for wood. It’s best to use a product that is water-resistant and suited for use in bathrooms. 3. Apply the Sealant Evenly: Use a brush or a clean cloth to apply the sealant in a thin, even layer. Follow the grain of the wood for the best results. 4. Let It Dry: Allow the sealant to dry completely. This might take a few hours, so it’s wise to plan according to the product’s instructions. 5. Repeat If Necessary: For added protection, you may want to apply a second coat after the first one dries. Sealing is a proactive measure that can greatly extend the life of an oak vanity, making sure it stays strong and attractive over the years. Daily and Monthly Maintenance Tips Maintaining your oak vanity involves a mix of good habits and regular check-ups, much like taking care of a beloved plant. Daily attention keeps minor issues from becoming significant problems, while monthly maintenance ensures everything remains in tip-top shape. For daily upkeep: – Wipe Down Surfaces: Make a habit of wiping down your vanity each day with a soft, dry cloth to remove water and prevent residue buildup. – Watch for Water: Quickly mop up any water spills or splashes to prevent them from soaking into the wood. Monthly maintenance involves: – Check for Signs of Damage: Look for new signs of moisture damage, like dark spots or warping, and address them promptly. – Polish and Protect: Use a wood-friendly polish to maintain the vanity’s finish and shine. This is a great time to touch up with sealant if wear is noticeable. With this straightforward routine, you’ll keep your oak vanity in top condition, ready to face the daily challenges of a busy bathroom. Choose the Right Cleaning Products Selecting appropriate cleaning products is essential for preserving an oak vanity. Some cleaners might contain harsh chemicals that could damage the wood or strip the protective sealant. It’s all about choosing products that align with wood care while keeping your workspace hygienic. When shopping for cleaning supplies: – Opt for mild, pH-balanced cleaners that won’t harm the wood. – Steer clear of bleach or ammonia-based products, which can be too harsh. – Consider natural solutions like a diluted vinegar and water mix for routine cleaning. Wrap-up Proper care and attention to detail keep your oak vanity looking its best. With these practices, you’ll not only preserve its elegance but also ensure it remains a cherished part of your home for many years. Taking these steps signifies more than just maintenance; it’s about valuing the beauty and function of your bathroom furnishings. To keep your bathroom looking its best, consider how an oak bathroom vanity can bring both charm and functionality to your space. Protecting and maintaining it ensures its enduring beauty. For a variety of stunning options that will elevate your bathroom design, explore the selection at CARGO Bathroom &
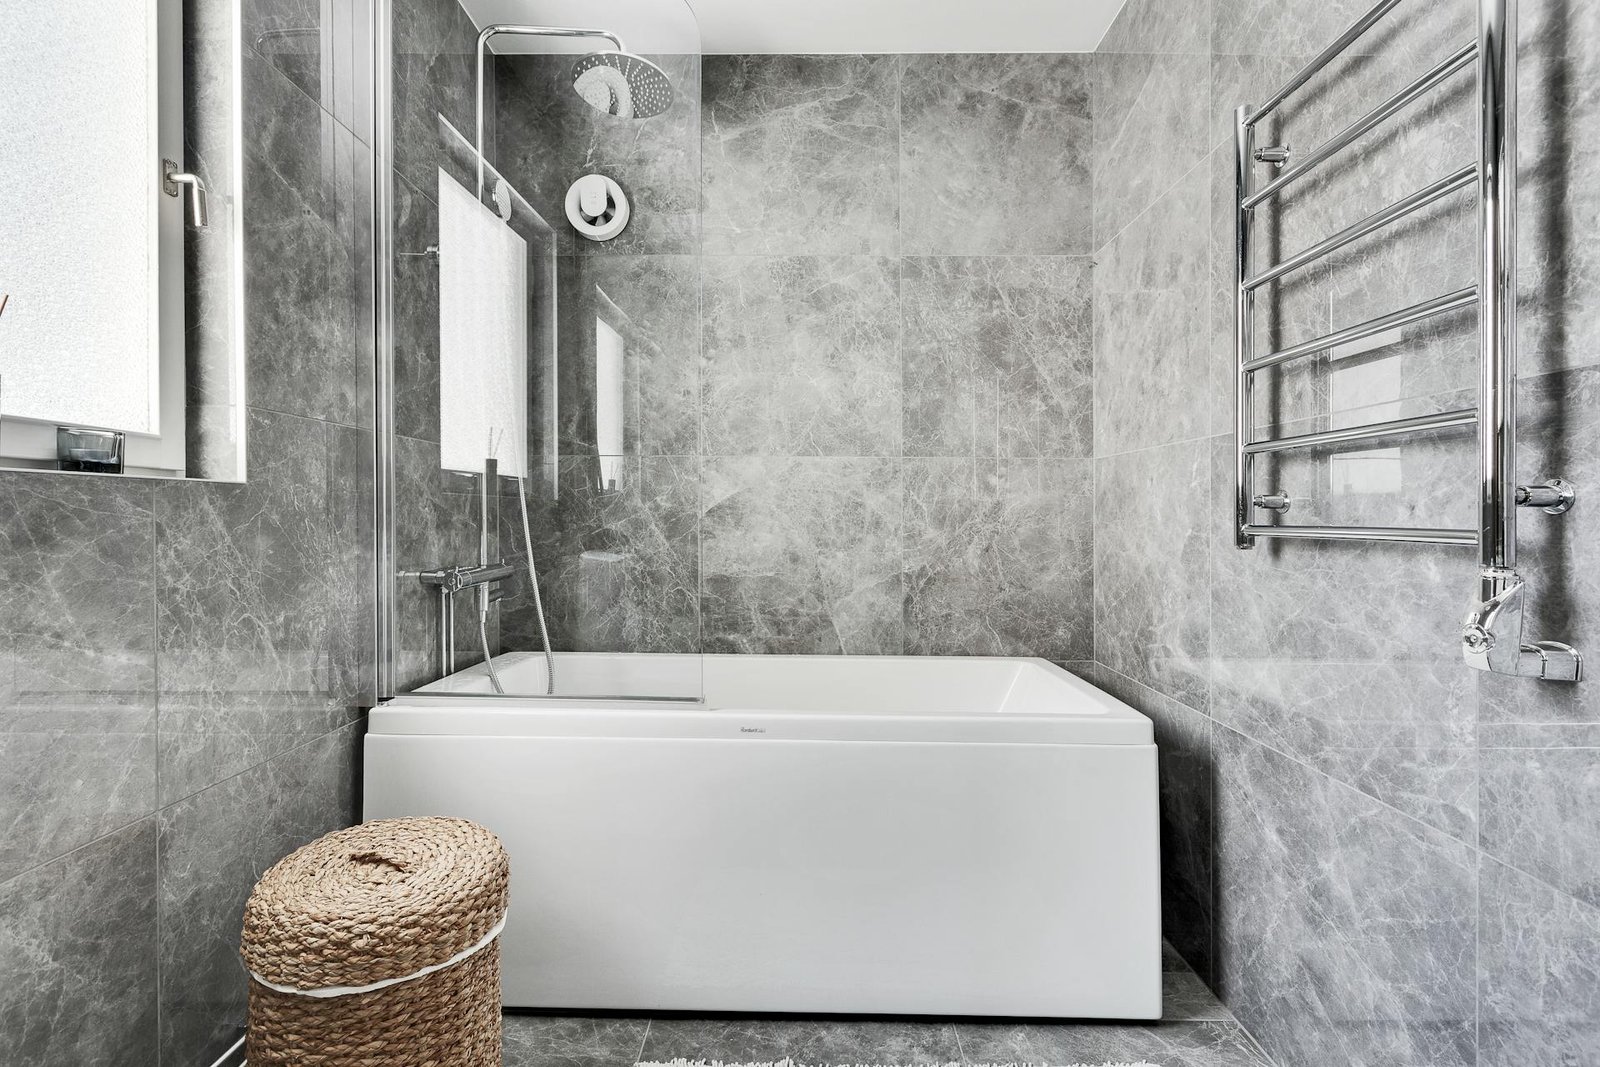
Dealing with Water Leakage in Back-to-Wall Bathtubs
Back-to-wall bathtubs have become a popular choice for homeowners seeking a modern and sleek bathroom look. These tubs, which fit snugly against the wall, are admired for their space-saving design and seamless appearance. However, as stylish as they are, they can sometimes face issues, especially when it comes to water leakage. A small leak, if left unchecked, can lead to larger problems, such as water damage to the surrounding areas, mould growth, and even structural concerns. It’s important to understand the common causes and signs of leakage before they escalate into wider issues. Imagine relaxing in your tub, only to come across a damp spot on the floor or hear the unsettling drip of water? Not exactly the kind of peaceful experience you’d want. But don’t worry, once you know what to look out for, spotting these leaks early becomes much simpler. Identifying the Source of the Leak Understanding where a leak might stem from in a back-to-wall bathtub is key to tackling it effectively. Tub connectors, where the plumbing meets the bathtub body, are one of the main areas prone to leakage. If these connections are not properly sealed, water can seep through, causing damage over time. Additionally, cracks or faults in the tub itself, perhaps from wear or manufacturing, can be sneaky culprits. Here are some common areas and signs to watch for: – Connector Issues: Check the joints where the plumbing pipes meet the bathtub. Any moisture or droplets here might indicate a problem. – Silicone Seals: The silicone or caulking around the edges of the tub can deteriorate. Look for peeling or gaps. – Cracks or Chips: Even a tiny crack in the surface of the tub can lead to leaks. Carefully inspect the tub surface for any visible damage. The best way to diagnose a leak is to visually inspect these areas regularly. Dampness, especially in unexpected spots, will often be one of the first clues that something isn’t right. Preventive Maintenance Tips The key to avoiding pesky water leaks is a bit of preventive care. Keeping an eye on your bathtub’s health can prevent small issues from becoming big headaches. Regular inspections are an excellent start. Every month or so, take some time to check the connections and seals around your back-to-wall bathtub. Look for any signs of wear, such as discolouration or flaking in silicone seals. These can be early indicators that a seal might give out soon. Maintaining the silicone sealants and caulking is important for preventing leaks. Applying a fresh layer when you notice any peeling or gaps will help maintain a tight seal. Make sure the area is dry and clean before applying new caulk to ensure it adheres properly. Remember, it’s a simple task but makes a big difference in preventing potential leaks. Another area to watch closely is the plumbing connections. Tightening loose connections can stop minor leaks before they turn into more serious ones. A quick peek under the tub from time to time can reveal any developing issues. Ensuring these connections are secure can save you a lot of hassle in the long run. Professional Solutions Despite your best efforts, sometimes leaks happen, and they might be beyond what you can handle solo. Knowing when to call a professional is handy. Professionals have the expertise to diagnose and repair the problem correctly without the trial and error that might occur with a DIY approach. For typical repairs, professionals might reseal connections, replace faulty plumbing parts, or address structural weak points in the tub that contribute to leaks. They bring in the right tools and experience to do the job efficiently. The peace of mind you get from knowing that a pro has thoroughly checked and repaired your bathtub can be well worth it. Opting to hire professionals rather than going at it alone has its advantages, such as saving time and potentially preventing further damage. With trained individuals handling the fix, you avoid the risk of improperly addressing the issue, which could lead to recurring leaks. Choosing the Right Products Selecting quality materials plays a big role in preventing future leaks. When it comes to sealants, caulks, or plumbing components, it’s important to invest in products known for their durability and reliability. Cheap materials might save a little upfront, but they often don’t last as long, leading to higher costs over time as issues reoccur. Look for sealants that are waterproof and mildew-resistant to ensure a lasting solution. Caulks specifically designed for use in bathrooms provide added protection against water and continuous moisture. Using high-quality plumbing components reduces the chance of leaks originating from loose or failing parts. Keep Your Bathroom Leak-Free Ensuring your bathroom remains dry and trouble-free is about proactive care. Regular inspections and calling in professionals when necessary are great steps to maintaining a leak-free space. By being attentive to early signs of wear and choosing the best materials, you set yourself up for a bathroom that stays in top shape. Addressing potential problems as they arise and choosing the right products keeps the bathing area enjoyable and functional. In the end, a little attention goes a long way to preserving your bathroom’s aesthetic and structural integrity. A well-maintained bathroom means fewer worries about leaks. For top-notch materials and expert advice, turn to CARGO Bathroom & Kitchen. To ensure that your bathing area remains both stylish and functional, explore our range of back-to-wall bathtubs today. By choosing our durable products and seeking professional guidance, you can enjoy your bathroom space without the hassle of unwanted leaks.
Solving Drainage Problems with Above-Counter Bathroom Basins
Drains are an essential part of keeping any bathroom running smoothly, and above-counter basins are no exception. These basins, known for their stylish design, offer a modern touch to bathrooms but can sometimes come with quirky drainage issues. It’s not just about water flowing down the drain—efficient drainage ensures your bathroom remains functional and free from annoying water puddles that could lead to messy situations. Knowing the causes of these troubles can help you in keeping your bathroom comfortable and hassle-free. When the drainage system doesn’t work as it should, it can mess up the look and feel of your bathroom. A place that should be spotlessly clean turns into a wet area that isn’t enjoyable at all. Thus, it is important to ensure that the drainage in these basins works well. This doesn’t just stop water from overflowing but also keeps bad smells away. Let’s take a look at some common drainage problems you’re likely to face with these basins and understand how they happen in the first place. Common Drainage Problems with Above-Counter Bathroom Basins Above-counter basins, although sleek, can sometimes cause a few headaches when it comes to water flow. The following list includes some common problems that often occur: – Slow Drainage: Often due to blockages in the pipe, slow drainage occurs when dirt, soap residue, or hair forms a clog, causing water to drain slowly. – Gurgling Noises: This issue signals that air is trapped in the pipes, which is usually a result of improper installation or pipe blockages. – Water Pooling Around the Basin: This happens when the basin is not correctly aligned with the counter or if the drainage is partially clogged, causing water to pool on the surface, which could lead to water stains. – Unpleasant Odours: Stagnant water or buildup in the pipes can lead to foul smells. The blockage doesn’t allow water to flow smoothly, creating unpleasant scents. Understanding these problems helps in identifying the exact reasons behind them. Poor installation often leads to gurgling sounds, whereas regular use without proper cleaning can result in blockages. By knowing what you’re up against, you can take the necessary steps to prevent these issues from occurring in your home. These problems are common but are usually easy to identify by the symptoms they show. Preventative Measures Preventing drainage problems with your above-counter basin can save you a lot of time and effort. Here are some useful tips to keep things running smoothly: – Regular Cleaning: Keep your basin and pipes clean by using mild cleaners weekly to prevent buildup. – Check for Leaks: Frequently inspect around and below the basin for any leaks that could cause water damage or bigger drainage issues. – Use Drain Covers: A good drain cover will catch hair and debris, stopping it from going down the drain and building up over time. – Pay Attention to Water Flow: If you notice the water is draining slower than usual, it’s time to check for clogs or call in a professional. It’s not just about cleaning up; it’s about doing regular checkups to avoid major problems down the line. Paying attention to small changes such as the speed of water drainage or any strange noises can allow you to address problems before they become serious. Keep these preventative tips in mind, and you’ll keep your above-counter basin in top condition, saving money and keeping your bathroom running smoothly without constant interruptions. Solutions for Existing Problems Dealing with drainage issues in above-counter basins doesn’t have to be overwhelming. Here’s a handy guide to help you sort out common problems with ease: – Slow Drainage: Start by checking for blockages in the pipe. A simple plunger can often dislodge minor clogs caused by soap and hair build-up. For persistent problems, you might need to use a drain snake or remove the U-bend to clear out the debris manually. – Gurgling Noises: If you hear a gurgling sound, it could mean air is caught in the pipes. Check the vent pipes on your roof to ensure they aren’t blocked by leaves or debris. If the gurgles continue, it may involve deeper plumbing issues that need a professional’s touch. – Water Pooling: Ensure the basin is correctly aligned with the counter, and double-check the slope of the drain pipe. Water pooling on the surface can indicate the basin is not seated properly, or there’s a partial blockage causing the water to back up. – Unpleasant Odours: To combat bad smells, clean the drain regularly with baking soda and vinegar. This natural solution breaks down residue and eliminates odours without harsh chemicals. Persistent smells might mean water is trapped due to an obstruction, requiring professional attention. For many of these issues, simple adjustments and regular maintenance can solve the problem. However, there comes a point when professional help is necessary. If you’re unsure or the problems persist, it’s wise to get in touch with a plumbing expert to prevent further complications. Benefits of Hiring Professionals Though some drainage issues can be tackled on your own, enlisting professional help offers numerous benefits. Professionals have the knowledge to identify the root cause of issues and prevent them from resurfacing. They come equipped with the right tools, ensuring a thorough resolution rather than a temporary fix. Here’s why calling in the experts makes a difference: – Expert Diagnosis: A professional can accurately determine what’s causing your drainage issue, whether it’s a simple blockage or a more serious plumbing problem. – Efficient Repair Work: They can complete the repair work quickly and effectively, reducing the risk of further damage and restoring your bathroom to pristine condition. – Long-Term Solutions: Experts provide solutions that last, offering peace of mind knowing future problems are less likely to occur. With professional assistance, potential issues are eradicated, and you also gain professional insights to maintain your bathroom’s functionality. Their expertise saves you time, stress, and perhaps even money in the long run, as a proper fix today prevents recurring problems tomorrow.
Handling Water Splash Issues with Square Bathtubs
Square bathtubs have become a popular choice for many homeowners due to their modern design and spacious feel. They bring a unique aesthetic to bathrooms, offering both functionality and style that suits contemporary living spaces. The structured edges and symmetrical shape make them an eye-catching feature in any bathroom. Imagine coming home after a long day and enjoying a soothing soak in a bathtub that feels both roomy and elegant. The appeal of square bathtubs often lies in the way they can make a bathroom look bigger and more sophisticated. However, along with their benefits, square bathtubs sometimes present challenges, particularly when it comes to water splash issues. It’s not uncommon for water to splash over the edges, especially during a lively bath or while using a handheld shower. This can become a nuisance, as it not only makes the bathroom wet and slippery but can also lead to water damage over time. Understanding the causes of these splashes and how to manage them is crucial for maintaining both the beauty and functionality of your bathroom. Identifying Water Splash Issues Water splash in square bathtubs can be attributed to several factors, each influencing the overall experience in different ways. One primary cause is the straight design of the bathtub. Unlike traditional round bathtubs where water can be contained more easily, square bathtubs have straight sides that allow water to escape more readily, especially if the bath is overfilled or if a showerhead is used without caution. Another factor can be the height of the individual using the bathtub. Taller individuals may inadvertently create more movement, pushing water towards the rim and over the edge. The impact of water splash goes beyond just a wet floor. Left unchecked, it can lead to damage around the bathroom, such as warped flooring, mould growth, and even potential slip hazards. These issues are not only inconvenient but can also become costly if repairs are needed frequently. Ensuring a dry and safe bathroom environment is essential for preventing these problems. Practical Solutions for Reducing Water Splash Tackling water splash issues doesn’t have to be a major headache. Here are some practical solutions to help keep your bathroom dry and comfortable: – Install splash guards or shower screens: These barriers can effectively contain water within the bathtub, preventing it from spilling over onto the floor. – Adjust water flow and faucet placement: Reducing the water flow during showers or baths can help control splashing. Additionally, consider the angle and placement of the faucet to minimise direct contact with the bath edges. – Use non-slip mats: Placing mats around the tub can absorb minor splashes and provide extra safety by reducing the risk of slipping on wet tiles. These measures are simple yet effective ways to maintain a splash-free environment, allowing you to enjoy the features of your square bathtub without the hassle of constant cleanup. Focusing on these adjustments can make a significant difference in how you experience your daily bath time. Regular Maintenance Tips Keeping a square bathtub in top condition isn’t too challenging with the right habits. Regular maintenance checks can prolong its life and make bath time worry-free. Start by cleaning the bathtub routinely. Use gentle cleaners to avoid damaging the surface, and pay attention to areas near the faucet and overflow, where dirt and grime tend to accumulate. Regular cleaning prevents build-up that can lead to more significant issues down the line. Another important aspect of maintenance is checking and replacing seals and caulk. Over time, these can wear out, allowing water to seep into the walls or floor, which might lead to moisture issues. If you notice any signs of deterioration, such as cracking or peeling, it’s time to replace them. Inspecting the drain is equally key. Ensure it is free from blockages to avoid overflow, as clogged drains can cause water to back up into the bathroom. With these practices, your bathtub will not only stay clean but also function as intended without any nasty surprises. Enhancing Bathroom Design to Minimize Splash Designing your bathroom thoughtfully can significantly reduce the chances of water splashing out of the tub. Placing the bathtub strategically within the room can make a big difference. For example, if it’s snug against a wall, especially with a protective barrier like a shower screen, it helps control the water flow and directs it back towards the tub. Think about the room layout, too. Open spaces around the tub are more prone to getting wet, so using screens or curtains can help. Choosing the right fixtures and accessories also aids in managing water better. Opting for taps and showerheads that direct water downward rather than outward keeps splashing to a minimum. You could also select handheld showers with adjustable settings to control the flow. Incorporating elements that naturally channel water away from the edges, like sloped ledges, can further safeguard against water escaping the bathtub. These design tweaks not only keep the bathroom dry but also provide comfort and peace of mind. Wrapping Up Your Splash-Free Square Bathtub Experience Enjoying a square bathtub without the hassle of water overflow is entirely achievable with smart planning and regular care. By addressing splash issues head-on through practical solutions and design enhancements, your bathing experience can remain enjoyable and mess-free. Proactively maintaining your bathtub ensures it stays in prime condition while preserving the overall health of your bathroom space. For those seeking expert advice and quality products to ensure a hassle-free bathroom environment, expert guidance can make a world of difference. With the right resources and support, you can redefine your bathroom into a serene retreat where style meets practicality. Transform your bathroom into a stylish and functional space by exploring high-quality options designed to prevent mess and water damage. With a wide range of modern features, square bathtubs offer a perfect blend of elegance and practicality. Discover the right solution for your needs with CARGO Bathroom & Kitchen.