Professional Solutions for Close-Coupled Toilet Repairs
A close-coupled toilet is one of the more common setups found in homes. It’s where the cistern is directly connected to the back of the toilet pan, making it compact and tidy. People often choose these because they’re easy to clean around and take up less space overall. But like any setup, problems can pop up over time, whether it’s with the flush, leaks from the base, or movement in the cistern. When something goes wrong, it throws off your whole bathroom routine. Toilets are one of those fixtures that you don’t think much about until they’re not working right. That’s when things get uncomfortable fast. While it can be tempting to open the lid and try to fix things on your own, most issues with close-coupled toilets are better left to professionals who know how to sort them out properly from the start. Common Issues With Close-Coupled Toilets Close-coupled toilets can seem straightforward on the outside, but inside they’ve got several parts working together. If any of them stop doing their job, you’ll usually notice right away. The problem might not be huge, but it can throw off the toilet’s performance and even lead to damage if left alone. Here are a few of the most common issues we come across with close-coupled toilets: – Leaking between the cistern and pan This is a common one and usually tied to worn-out rubber seals or washers. Water may pool around the base or slowly leak over time. If ignored, flooring and nearby surfaces can take a hit, and you might end up contending with mould. – Loose or shaky fixtures If the toilet wobbles when you sit down or the cistern wiggles, the mounting brackets might have loosened. That movement can wear down seals and even cause internal components to shift or crack. – Trouble flushing Whether it flushes weakly, keeps filling, or takes multiple pushes to get going, these problems usually point to issues with the flush valve, fill valve, or build-up in the inlet. Sometimes sediment makes the water slow to refill too. – Cracks in the ceramic Even though ceramic is strong, it’s not invincible. A dropped item or years of pressure can cause hairline cracks in the cistern or pan. These can start as a slow leak and turn into something bigger. – Odd noises Clunking, hissing, or whistling after flushing often signals trouble inside the cistern. The float mechanism or inlet valve might not be working as it should. It’s not always an urgent fix, but it’s usually a sign something needs attention. Beyond being an annoyance, these problems can mean higher water bills, extra cleaning, and the risk of longer-term damage. Catching them early is the smartest move. Why Professional Help Makes All The Difference Fixing a toilet might look easy online, but many issues are more complex than they seem. That’s why having a licensed plumber take care of it is a smart, safe choice. They know how everything works together inside the toilet and bring the right parts and tools to get it fixed properly. Here’s what a plumber brings to the table: 1. Proper diagnosis A trained plumber can immediately identify whether it’s a faulty seal, cracked part, or a valve issue. No guessing, just a straight fix. 2. Right tools and spare parts Many plumbing components aren’t easy to find at your local store. Plus, close-coupled toilets often need specialised tools to undo bolts or reach awkward parts without damage. 3. Safe handling The ceramic in toilets can break with too much pressure. Pros know how to handle and reseat the cistern with care to prevent new issues while fixing the old ones. 4. Longer-lasting repairs Temporary fixes often don’t hold. A plumber sorts the underlying cause, so you’re not dealing with it again in a few weeks. 5. Compliance with current standards Plumbing standards evolve. What was acceptable a few years ago might not meet today’s efficiency or installation guidelines. A licensed tradesperson knows and follows the latest rules. Let’s say your flush button is stuck and you replace it, but the flushing still feels weak. A plumber won’t just stop at the button. They’ll check the whole system, adjust or replace what’s needed, and test it before finishing up. That’s what reliable service looks like. When you trust a professional, you’re not just fixing a problem, you’re avoiding long-term damage and future call-outs. That’s good news for both your comfort and your budget. Steps Professionals Take to Repair Close-Coupled Toilets A good plumber follows a methodical process that doesn’t just solve the visible issue but digs into what’s really causing it. Depending on the problem, repairs can range from quick part swaps to full cistern reseating. Here’s a breakdown of what you can expect: 1. Initial inspection A plumber starts by checking for leaks, cracks, wobbly parts, or odd flushing behaviour. Diagnosing the problem upfront saves time and prevents guesswork. 2. Turning off the water supply They’ll cut off the water supply and flush the toilet to clear out the cistern. That way, there’s no mess, and the area stays dry while they work. 3. Removing the cistern if needed If seals or bolts are the issue, the cistern may need to be taken off. This gives access to the connectors and internal components where many issues start. 4. Swapping out faulty parts Whether it’s the flush valve, washers, or the fill mechanism, this is where those worn-out parts get replaced with new, compatible pieces. 5. Reassembling and testing After everything’s back in place, the plumber restores water flow and tests the flush several times to make sure it’s working correctly. They also check for any movement or drips. 6. Fine-tuning Small adjustments follow. This can mean sealing joints firmly, making sure the water level fills correctly, or aligning the cistern properly so it sits tight and stable. This thoughtful approach stops small errors from creating new problems. Something as simple as a misaligned seal can undo
Expert Guide to Tapware Selection in Melbourne Homes

Choosing the right tapware can make a surprising difference in how your bathroom looks and feels. It’s about more than turning on a tap. It’s how that piece fits with the rest of your design, how it feels to use it every day, and whether it’s going to last without issues. In Melbourne, where bathroom styles shift between heritage character and sleek modern design, getting the tapware right makes a big impact. Whether your space calls for minimal lines or something more classic, the taps you choose help bring the full picture together while making the space more functional. Bathroom tapware is a smart way to refresh your space without ripping everything out. Changing up styles or finishes can update the whole mood of a room. But it’s not about looks alone. A tap that’s annoying to use or awkwardly placed can get on your nerves pretty quickly. One that fits comfortably, works well, and lasts makes all the difference. It’s that perfect mix of style and function that makes the right tapware a real win. Types of Tapware Available When you start shopping for bathroom tapware, the number of choices can be a bit much. But once you understand how each one works and where it fits best, narrowing it down comes easy. Different tapware suits different setups, so how your bathroom is laid out plays a big role in what’s going to work. Here are some of the most common types you’ll see in Melbourne homes: 1. Mixer Taps These combine hot and cold water through one spout, controlled by a single lever or handle. They’re popular in modern bathrooms for their sleek, streamlined look and how easy they are to use. Great for vanities or bathtubs, mixer taps offer smooth temperature control and have become a go-to in both new builds and renovations. 2. Wall-Mounted Taps These are installed directly into the wall above your basin or bathtub. Wall-mounted taps save benchtop space, which makes them a great choice in smaller bathrooms. They also add a clean and tidy feel. More and more Melbourne homes are leaning toward this setup, especially in tight or contemporary spaces. 3. Three-Piece Tap Sets This is the more traditional option, with separate taps for hot and cold water and a central spout. They’re ideal for older or period-style homes where keeping some of that heritage charm is important. With this style, it’s often easier to repair individual parts too, which is handy long-term. Across Melbourne, homeowners are mixing things up. Apartments and new builds often go with mixers or wall-mounted styles for a clean, bright finish. Meanwhile, older homes in suburbs like Carlton or Brunswick often still feature three-piece sets to keep the original style intact. Factors to Consider When Choosing Tapware Looks matter, sure, but there’s a lot more to think about before choosing tapware. These are items you’ll use every day, so something that’s difficult to turn or doesn’t flow well quickly wears out its welcome. On top of that, the setup behind the wall counts just as much as what you see on the outside. Whether you’re renovating an older place or fitting out something new, here’s what to keep in mind: – Water Efficiency In Melbourne, water-saving rules are in place, which is where the WELS rating comes into play. Choosing a tap that’s rated well means you’ll be using less water without losing flow, which is good for the environment and your bills. – Durability You’ll want something that holds up to regular use—especially in busy households. Look for solid brass bases and ceramic disc cartridges. These materials tend to perform better over time and resist leaks and damage. – Functionality Think about who’s using the space and how. If kids need to use the basin, look for easy-grip levers. For elderly users, taps with less resistance make things easier. Tap height and reach also matter, especially if your basin is shallow or deep. – Bathroom Style Tapware sets a tone. Matte black can feel bold and modern, while polished chrome still holds up well in traditional settings. Match the tapware with things like towel rails and shower fittings to keep the look consistent. – Plumbing Setup If you’re flipping between styles—say from a three-piece to a wall-mounted tap—the plumbing may need to shift too. That’s where things can get tricky. It’s a smart idea to check your current pipe positions and get advice before buying new items. Getting the right tap isn’t just about preferences. It’s about picking something that suits the space, works with the current setup, and feels good to use. Popular Materials and Finishes Once you’ve got a good grip on the type of tap that suits your space, the next choice is what it’s made of and how it looks. The material and finish can influence durability, ease of cleaning, and vibe. Pick one that works well with the rest of your bathroom and handles wear and tear. Here are some materials you’ll find: – Stainless Steel One of the best options for rust and stain resistance, stainless steel is hardy and low maintenance. It’s a top pick for bathrooms with high moisture or where airflow isn’t great. Over time, it holds up nicely and still looks clean. – Brass Heavier and solid, brass tapware is known for durability and longer lifespan. It often forms the base on high-quality fittings and gives a strong, solid feel. Because of its weight, it’s better suited to fixtures that stay in place or see a lot of use. – Chrome-Plated Brass A popular combo, this has a shiny finish with the solid durability of brass underneath. Chrome works well in most bathrooms because it’s neutral and reflects light, brightening up the room. When it comes to finishes, here are some popular picks around Melbourne: 1. Matte Black Great for a bold, modern look. Just be mindful—it tends to show water spots and fingerprints if not cleaned regularly. 2. Polished Chrome Still a fan
Professional Solutions for Slimline Unit Installation Issues

Slimline bathroom vanities have become a popular pick for anyone wanting a more modern, space-saving layout. Their narrow, sleek profile makes them perfect for smaller bathrooms, ensuites or powder rooms where floor space is limited. They blend style and function without taking up too much room, creating a clean and minimal look that fits well in both new builds and renovations. That said, installing a slimline vanity isn’t always straightforward. Some units can be tricky due to their compact size, which leaves less room for error when it comes to fitting pipes, sealing joins or aligning them with walls. If these things aren’t done well, it can lead to problems like leaks, poor drainage or even damage to your wall or floor. That’s where expert help really makes a difference. Common Installation Issues With Slimline Units The narrow design of slimline vanities may look sleek, but it also means there’s very little wiggle room during installation. Things like uneven walls, tight corners or mismatched pipework can cause more hassle than expected. A few issues that often come up are: – Poor measurement planning A common problem with slimline vanities is incorrect measurement during setup. Homeowners might rely on old bathroom plans or guesswork, which leads to vanities that don’t fit neatly or restrict movement in tight spaces. Even being off by a few centimetres can make plumbing connections fail or leave edges unaligned. – Awkward plumbing placement Because of their compact size, slimline units don’t always line up with existing pipework. Many older homes have plumbing that’s not set up for these modern units. Pipes may need relocating or trimming, which can get messy if handled without the right tools or experience. – Mounting and attachment hassles Slimline vanities often need secure wall mounting. If not attached properly, over time the unit can shift, crack or even fall. Things like wall studs might not be in ideal positions, and walls can sometimes be uneven or hollow in spots where support is needed most. – Lack of storage and tight interiors Inside a slimline vanity, there’s usually not a whole lot of space to work with. Poor internal layout can make it harder to connect drainage and water lines or lead to pipes knocking against the cabinet body, causing noise or vibration. It might sound simple at first, since it’s “just” a vanity. But all of these small details can snowball into bigger issues if they’re ignored. For example, someone might try squeezing in a unit thinking everything looks good on the outside, only to find out later that the plumbing behind it won’t cooperate or the entire cabinet leans out from the wall. Fixing issues after the unit is already installed can cost more time and money than getting it done right the first time. That’s why it helps to know how professionals work around these challenges. Professional Solutions To Slimline Unit Installation Problems Getting the right fit is half the battle, and that’s where expert experience really counts. Professionals typically start with a full measure-up. They don’t just look at surface dimensions. They’ll check wall levels, location of existing plumbing and overall usability in the space. Here’s what pros usually focus on: 1. Accurate measuring and layout planning Installing a slimline vanity isn’t just about width and height. Professionals look at how deep the unit goes, check the floor gradient and even take notes on wall angles. This way, everything’s taken into account before the unit is placed. 2. Making plumbing fit the compact design When water lines or drainpipes don’t line up with the new vanity, experts know how to adjust them without damaging nearby fixtures. They’re trained to reroute plumbing in a clean and sealed way that fits within the vanity’s tight walls. Seals and joints are double-checked to stop leaks before they start. 3. Sturdy mounting techniques Wall strength varies between homes. Some walls are brick while others use recessed timber. Professionals will find secure anchor points like wall studs or use proper fixings for masonry. This keeps the vanity solid over time, even in high-use bathrooms. 4. Maximising usage while keeping it neat Even though slimline vanities have less storage space, tradespeople often make adjustments inside the unit to keep plumbing tidy and functional without using up all the cabinet room. This might mean repositioning drawers or cutting panels to match plumbing routes. When these steps are done right, the vanity fits better, looks polished and lasts much longer without surprises. It also keeps water and moisture from causing damage inside the unit or in the wall behind it, helping your bathroom stay tidy and safe. The Importance Of Professional Installation For Slimline Vanities Doing things on your own might seem like the quicker option, but when it comes to installing something as precise as a slimline vanity, it can easily go sideways. These units require things to line up perfectly. Plumbing fittings, wall alignment and storage functions all have to work together in a pretty tight setup. Without training or the right tools, what starts as a quick install can turn into a long, frustrating fix. Even if it’s installed and seems fine at first glance, poor connections or dodgy sealing can show up later. Leaks behind the wall, gaps between the vanity and tiles, or drawers that won’t close properly are all signs something’s off. Fixing those issues later can end up costing more than getting the job done professionally from the start. Professionals know the common pain points, and they plan ahead to avoid them. They’ll spot potential hiccups before anything’s drilled in. More than that, they use fitting methods and materials designed for the specific type and model of vanity being installed. That reduces any need for future patch-ups or rework, and everything feels and functions like it should from day one. There’s also the benefit of getting proper maintenance advice during the install. Whether it’s the best way to clean around fittings, how to keep silicone joins intact, or
Expert Guide to Quality Bathroom Supply Shopping
Bathroom supply shopping can get overwhelming quickly. With different types of toilets, tapware, vanities, and basins to consider, it’s easy to look at shelves of options and feel unsure where to begin. Most people want a space that’s comfortable, reliable, and looks good too. The right products can make that happen. But if those items aren’t picked with care, even a beautiful bathroom can become frustrating to use. That’s why it helps to shop with a plan. Knowing what matters most for your space will save time, money, and stress. Whether you’re upgrading one product at a time or taking on a full remodel, thinking through your needs makes the whole process smoother. Here’s how to approach bathroom supply shopping with clarity and confidence. Understanding Your Bathroom Needs Starting with a clear understanding of what you want from the space will make every decision easier. That means thinking beyond appearances and asking how the bathroom is used each day. A family bathroom, for instance, has very different needs than a small ensuite or guest powder room. Here are the three big things to look at before shopping: 1. Layout and Space Measure the space accurately. Think about where you enter, how far doors open, and how much clearance is needed for things like drawers, cabinet doors, and toilet seats. Take note of plumbing points too. Moving those around later can be a major cost, so try to work within the current setup if it works. 2. Usage and Function Who uses the bathroom, and how often? A high-traffic family bathroom may need more durable finishes and better storage, while something used only occasionally can focus more on looks or simplicity. Consider things like splash zones too. Do you need wall tiles that hold up to kids’ bath time messes or a double basin for rush hours in the morning? 3. Style and Design Preferences What sort of look are you going for? Clean and modern, natural and earthy, or bold and moody? Think about colours and textures you like, but also what fits the rest of the home. For example, a sleek black vanity might look stylish, but if the rest of your bathroom is light and rustic, it might feel out of place. Take one couple we worked with as an example. They were drawn to a glossy white wall-hung basin with a modern squared edge, but their home had timber-toned natural finishes and soft curves throughout. After discussing their design, we found an off-white ceramic option with warm undertones and a rounded front that tied everything together better. It’s these little connections that bring a bathroom to life. When you line up space, use, and style early, future shopping decisions become much more practical and less stressful. Key Factors To Consider When Shopping For Bathroom Supplies Once you know your bathroom needs, the next step is checking the right product features. A lot of the best decisions come down to how long something will last, how it fits, and whether it’s worth the price. Keep these points in mind: – Material Quality Look for products made from long-wearing materials. Ceramics, stainless steel, and quality laminates tend to hold up better over time. Steer clear of anything that looks or feels thin, as that’s often a sign it won’t go the distance. – Match With Current Setup Whether you’re keeping your plumbing where it is or replacing just one piece at a time, it pays to check compatibility. For example, a new basin might be lovely, but if the waste hole doesn’t align with your existing pipework, it can turn into a major headache. – Practical Build Features Soft-close drawers, adjustable shelves, and anti-fog mirrors might seem small, but they make daily use easier. Features like these often shape how a space feels over time. – Realistic Budgeting It’s easy to fall for trends without thinking about lasting use. Set a budget that leaves room for the right finish or handy upgrade. You don’t necessarily need the most expensive pieces, but buying too cheap often leads to replacements. Focus on what gives value long-term rather than just the upfront cost. Having these checks in place means you’ll pick items that do their job well, hold up over time, and blend into your layout without causing issues later. Must-Have Bathroom Supplies and How to Choose Them When you’re building or updating a bathroom, there are certain product types you simply can’t skip. Choosing the right version of each makes sure everything works together, lasts longer, and fits into your daily routine without stress. Here are some bathroom staples you’ll want to give careful thought: – Toilets A toilet should be efficient, comfortable, and easy to clean. Look at seat height, flushing volume, and available space. Compact models work great in tighter spots, while wall-faced or concealed cisterns give a cleaner look without too much bulk. – Basins There are many types, from wall-hung and inset to above-counter and pedestal options. How much bench room you have can help decide what suits best. Wall-hung basins are handy in smaller rooms, while above-counter models suit spaces with extra bench space. Watch out for shallow designs if you want to avoid splashing. – Bathtubs Not every space has room for one, but many people still want that bath option. Freestanding tubs look luxurious, but back-to-wall or inset styles make more sense if you’re short on space. Remember to check that the tub matches your installation requirements. Some types need extra waterproofing or support. – Tapware and Showerheads Pick fixtures with good build quality. Ceramic disc cartridges help with smoother, longer-lasting operation. Pull-out mixers are handy in vanities, especially for families. Make sure your chosen tapware suits the water pressure in your home so you don’t end up with weak flow from a stylish but unsuitable piece. – Storage Units Cabinets, open shelving, and mirrored shaving units all help keep a bathroom tidy. Think about how much you truly need to store. For
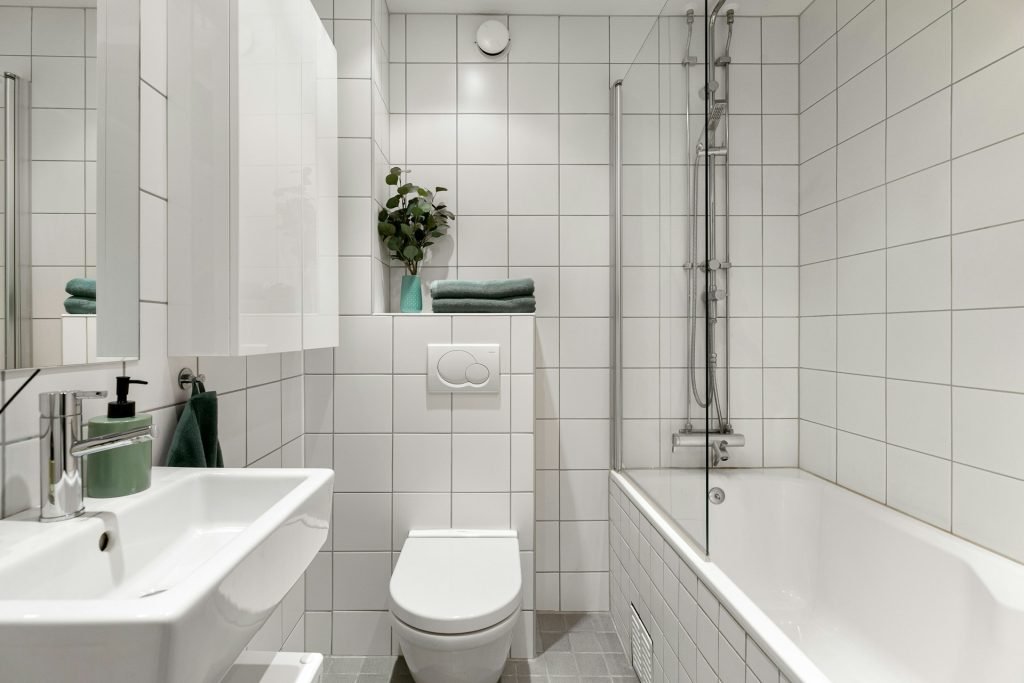
Professional Solutions for Ceiling Mount Shower Problems
Ceiling-mounted showers look sleek and modern, no doubt about it. But when problems pop up, they can be frustrating to deal with. Unlike a wall-mounted setup, everything is overhead, which means small issues can feel like big ones when water starts dripping in the wrong direction or the flow stops feeling as good as it should. And because they’re more tucked away in design, it’s easy to miss early signs of trouble. If your ceiling-mounted shower isn’t doing its job properly, it’s not just an annoying inconvenience. It makes daily routines harder. You start rushing through what should be a relaxing rinse or dealing with clean-up after leaks. These problems are common, but with the right approach, they don’t have to stick around. Paying attention to a few key things can help keep your overhead shower in good shape and performing the way you expected when it was first installed. Identifying Common Issues With Ceiling-Mounted Showers Ceiling-mounted showers are known for their clean design and overhead nature, but they also come with their own set of unique problems. Most of the time, when homeowners notice something wrong, it will come down to one of these three issues. 1. Low water pressure If you turn on your shower and feel more drizzle than downpour, water pressure could be the issue. This can happen due to blockages inside the showerhead, build-up in the plumbing or pressure drops in the household water supply. It’s especially annoying in a ceiling-mounted shower because the water is meant to fall straight down, giving a rain-like feel. Without the right flow, it just doesn’t work well. 2. Leaks around the shower arm or fittings Since ceiling-mounted setups need to run through the roof cavity, leaks can be a bit harder to spot. Still, water can find its way into ceiling panels, cause strange droplets on the floor or even damage the paint and surfaces nearby. These types of leaks often happen at the connection point between the ceiling and the shower arm, especially if the fittings have come loose over time. 3. Uneven water spray Sometimes, the pressure looks fine but the water just doesn’t come out evenly. You might get a strong flow on one side and barely anything on the other. That’s often due to clogged nozzles or uneven build-up within the showerhead. In some cases, the internal flow regulator inside the ceiling-mounted shower arm gets blocked or damaged. All these issues affect how the shower feels to use. Something as simple as uneven spray or poor flow can make an otherwise clean and well-designed bathroom feel outdated or broken. Recognising these signs early makes it easier to fix the problem before it spreads into something costlier or harder to manage. Solutions For Common Ceiling-Mounted Shower Problems When you’re dealing with these kinds of shower problems, getting to the fix quickly can make all the difference. Some solutions are simple, others more serious, but knowing where to look is the first step. Here are some practical fixes depending on what you’re facing: – Low water pressure – Unscrew and clean the showerhead. Mineral deposits and soap scum often block the small nozzles. – Check the household pressure at other taps. If the whole house is affected, it may be a broader plumbing issue. – Inspect the ceiling-mounted shower arm. If it’s corroded or blocked internally, it might need cleaning out or replacing. – Leaking around the fitting or shower arm – Look for moisture or drips around the ceiling connector. This usually signals a loose seal or worn-out washer. – Switch off the water, remove the shower arm and check for signs of wear. Rust, cracked fittings or stripped threads should be replaced. – Apply new plumber’s tape on the threads before reinstalling to improve sealing. – Uneven spray pattern – Use a soft toothbrush to clean individual nozzles on the face of the showerhead. – For more stubborn cases, detach the head and soak it in a vinegar solution to flush out mineral build-up. – If cleaning doesn’t help, the internal parts could be worn, and it may be time to look at getting a replacement. Even though some steps sound simple, remember this is in the ceiling and involves plumbing that’s not always easy to get to. If anything feels beyond what you’re comfortable doing, it’s best to bring in someone who works with these systems regularly. A simple mistake with a leak in the roof can lead to much bigger problems later. Better to be safe than patching up water damage down the track. Maintaining Your Ceiling-Mounted Shower Once your ceiling-mounted shower is back in decent working order, the next step is keeping it that way. These systems are a bit more tucked away than regular wall-mounted options, which means they need closer attention every few months to help prevent hidden issues from creeping in. Here’s a simple maintenance checklist to follow: – Wipe down the showerhead once a week to help avoid grime and soap scum build-up – Once a month, run a vinegar flush through the showerhead by filling a plastic bag with vinegar, tying it over the showerhead and letting it soak for an hour – Every few months, inspect the ceiling area around the arm for early signs of leaks or moisture spots – Check the fittings if they ever feel loose or look worn over time – Keep an ear out for changes in sound when water runs. Strange noises might mean pressure problems or blockage forming – Clean out the filter or pressure regulator if your unit has one built in It’s also worth pointing out that ceiling-mounted shower arms may require different products or techniques than standard setups. If you have an extension or an overhead panel system, follow the manufacturer’s care instructions so you’re not accidentally damaging something with the wrong tool or cleaner. When To Get Help From A Professional There’s a lot you can stay on top of with regular cleaning
Professional Guide to Bath and Shower Supply Selection
Choosing the right bath and shower supplies can make a big difference in your day-to-day comfort. It’s not just about looks. The taps you turn, the shower head you use each morning, even the drain that clears away water all affect how smoothly your routine runs. If something doesn’t work quite right, it’s frustrating. But when you’ve got the right setup working together, everything feels easier. That convenience starts with choosing the right parts for your space. No two bathrooms are exactly the same, which means what works for someone else might not work for you. Whether you’re updating a single piece or planning a bigger project, knowing what to look for can save you time and stress. From materials to water pressure to cleaning tips, understanding the basics helps you make better decisions. You don’t need to be an expert to make a smart choice. Just a bit of clear advice goes a long way. Understanding Different Types Of Bath And Shower Supplies There’s a fair bit of variety when it comes to bathroom supplies, and knowing what the different items do can help you narrow things down. Here are some of the main types to think about: – Shower heads: These come in traditional wall-fixed styles, handheld options and overhead (rain-style) models. Different types offer different flow rates and spray patterns. It’s worth thinking about how you like your shower to feel. – Taps: You’ll find mixer taps, wall-mounted taps and three-piece tap systems. Some are sleek and modern while others lean more classic. The style you choose can affect both appearance and function, especially if water pressure is a factor. – Drains: Often overlooked, the drain needs to be able to keep up with water flow, especially for walk-in showers or freestanding baths. Choosing the right one can prevent slow drainage or annoying pooling. – Bath screens: Common with shower-over-bath setups, these come as hinged, fixed, framed or curved models. They help contain water without needing to use a curtain. Material choice plays a role too. Stainless steel tends to be strong and resists rust, which is handy in areas that get splashed often. Chrome has a polished look but might need more wiping to keep clean. Some cheaper options use plastic, which may wear out quicker but can do the job in lower-use bathrooms. If you’ve got kids or anyone with reduced movement in the house, usability matters. Single-lever mixer taps are easier to use with one hand. Some shower heads come with longer hoses or easier-to-adjust heads, which can help as well. Style matters once the basics are sorted. For modern bathrooms, squared-off fixtures and brushed finishes often match well. If the space leans more rustic or classical, you might go for rounded lines and vintage-look tap styles. You want it to work and look right, without giving up one for the other. Factors To Consider When Choosing Supplies Choosing bath and shower supplies isn’t just about matching finishes. There are other things worth thinking about before going ahead. 1. Water pressure Not every tap, shower head or valve works well with low or even average pressure. If you live in an older home or use a gravity-fed system, your choices can be limited. Knowing the pressure your home provides will help you avoid fittings that underperform or splutter. 2. Space and positioning If you’ve got a small bathroom, then every bit of room can count. Wall-mounted taps or slimline screens can free up more area. Folding glass screens might work better than fixed panels. Compact showers and basins can make tight layouts feel less cramped. 3. Matching finishes and design Keeping your hardware in a similar style helps create a pulled-together look. Taps, shower mixers and waste covers don’t all need to match exactly, but sticking to similar tones or lines brings some calm and order to the room. Mixing too many colours or finishes can feel messy fast. 4. Daily use Think about who’s using the bathroom and how often. Guest bathrooms won’t need the same hard-wearing features as the main one used daily by a family. Choose fittings that can handle wear if they’ll see a lot of use. A handy way to start is by measuring your space and listing what you actually need. It avoids last-minute guesswork or grabbing something that doesn’t really suit your bathroom setup. Maintenance Tips For Long-Lasting Bath And Shower Supplies Bathrooms get used regularly, so keeping things clean and functional can save you from needing to replace things too soon. A little upkeep now and then keeps everything feeling newer for longer. Stick to soft cloths and avoid rough scrubbers. Harsh tools can scratch finishes, especially on chrome or brushed metals. Use mild cleaners, and skip strong acidic products unless they’re made for bathroom use. Shower heads can clog over time from mineral build-up. A bit of warm vinegar solution now and then will clear it out and get the flow back to normal. This is especially useful in areas with harder water. Drains often collect hair, soap, and gunk over time. Using a hair catcher or occasional drain cleaner can help stop blockages. Seals around trays and screens should be checked once in a while too. When the silicone around your shower or bath starts to peel or crack, that’s a sign it’s time for a refresh to avoid leaks or mould. Here are some simple things to do regularly: – Wipe surfaces each week to prevent marks and grime – Rinse around shower heads and traps every month or so to clear any residue – Check tap handles for stiffness and lubricate if needed – Keep products away from hinges on screens to avoid weight damage – Look over seals and replace once they show signs of wear Picking strong materials is one thing, but looking after them makes the difference between a bathroom that stays tidy and one that slowly wears out. Finding Quality Bath And Shower Supplies Where you get