Low Pressure Problems in Your Bathroom Tap System

If you’ve ever turned on your bathroom tap and wondered why the water’s only trickling out, you’re definitely not alone. Low pressure can be frustrating whether you’re racing to wash your hands or trying to rinse out toothpaste without standing there forever. Slow-flowing taps aren’t just annoying either. They often signal a bigger issue behind the walls or under the sink. There are a bunch of reasons a tap might not give you the water flow you expect. Some can be sorted out quickly, while others might need a closer look. The sooner you catch the cause, the less likely it turns into something that messes with your whole bathroom routine. Let’s take a closer look at what might be slowing things down and how to start sorting it out. Understanding Low Water Pressure in Bathroom Taps Low water pressure in bathroom taps can sneak up slowly or show up out of nowhere. You might shrug it off the first few times, thinking it’s a busy water usage time in your house, but if it becomes a regular thing, it’s worth digging deeper. Here are a few symptoms to pay attention to: – Water dribbles instead of flowing strongly when you turn the tap – Pressure changes throughout the day, even when no one else is using much water – Low pressure in one tap but not others – Slower-than-normal filling of basins or containers Sometimes, the issue is isolated to just one tap in the bathroom. This usually points to a local problem, like a blocked aerator or faulty tapware. Other times, it affects the whole home’s water flow, which may hint at a more serious plumbing or supply connection dilemma. The type of tapware you’re using can also play a part. Older bathroom tapware sets may not be designed to work well with modern plumbing systems or could be worn out, limiting how much water gets through. Identifying when and where the low pressure kicks in, whether it’s morning peak times or all day long, can help narrow down what’s going on. Possible Causes of Low Water Pressure It helps to break the issue down into three main areas: aerators, water supply, and pipes. Each one can affect your water flow and might need different actions to fix. 1. Blocked Aerators This is one of the most common and easiest issues to check for. The aerator is the small mesh piece screwed on the end of most tap spouts. Over time, these catch debris, limescale, or sediment from your water supply. Not only does this reduce flow, but it can also mess with the water’s direction. What to do: – Unscrew the aerator and check for buildup – Rinse it under water and scrub gently with an old toothbrush – If it’s cracked or too blocked, it might be time to replace it 2. Water Supply Issues Low water pressure across every tap in your place usually points to a problem with the incoming water supply. A partially closed main valve, pressure regulator fault (if you’ve got one), or even water works on the street can all reduce flow. Keep an eye out for: – Pressure changes throughout the day – Neighbours experiencing the same issue – A slight humming or vibrating noise from the pipes 3. Plumbing Pipe Problems Hidden leaks, corrosion, or blocked sections can all slow pressure down. In older bathrooms, pipes can narrow with built-up gunk. In colder areas, there’s sometimes pipe shifting or cracking if there’s been big seasonal swings. Look for signs like: – Damp walls or under-sink cabinets – Rust-coloured water at first flow – A drop in pressure when multiple taps or showers are running Since pipe problems are rarely visible on the surface, it’s best left to the pros. Fixing it early can prevent more expensive repairs down the line and keep things safe in your bathroom and beyond. Solutions to Improve Water Pressure in Your Bathroom Once you’ve figured out what’s likely slowing things down, the next step is solving it. While some problems can be seen on the surface, others are tucked away in pipes or behind walls, which is where professional help really pays off. Let’s break down a few common fixes: – Cleaning or replacing blocked aerators If you’ve spotted gunk or sediment in your tap’s aerator, removing and rinsing it may do the trick. If it’s worn out or cracked, replacing it with a new one is often a quick fix that makes a big difference. – Checking main water valves Sometimes the issue lies right at the source. Your water main may not be fully open after recent works or upgrades. A partial closure can limit flow. This can be easy to inspect but adjusting it requires care to avoid damaging the valve or pipe fittings. – Professional inspection of plumbing systems If you suspect deeper pipe issues, a licensed plumber should be your next call. They can check for blockages, mineral build-up, or small leaks that slowly reduce pressure. In older homes, corroded or outdated pipework is often the root of the problem. Replacing narrow or ageing plumbing may be the most effective long-term solution. If water pressure varies a lot between different fixtures, inconsistent plumbing design might be affecting how water is distributed. A professional can identify layout issues that disrupt even flow and recommend how to improve things across your bathroom setup. The Role of Quality Tapware While the problem might sometimes feel hidden, your tapware could be playing a big part. Design, build quality, and internal flow restrictions in tapware all influence water pressure. If your bathroom tapware sets haven’t been upgraded in years, it’s worth looking at how well they’re performing, especially if they’re paired with newer plumbing or fixtures. Some older taps, even in good condition, have outdated flow control mechanisms that weren’t made for modern mixers or low-pressure systems. Inconsistent spray patterns or splashing, especially when the flow increases, may suggest the tap isn’t working
When Your Ceiling Shower Arm Needs Professional Attention
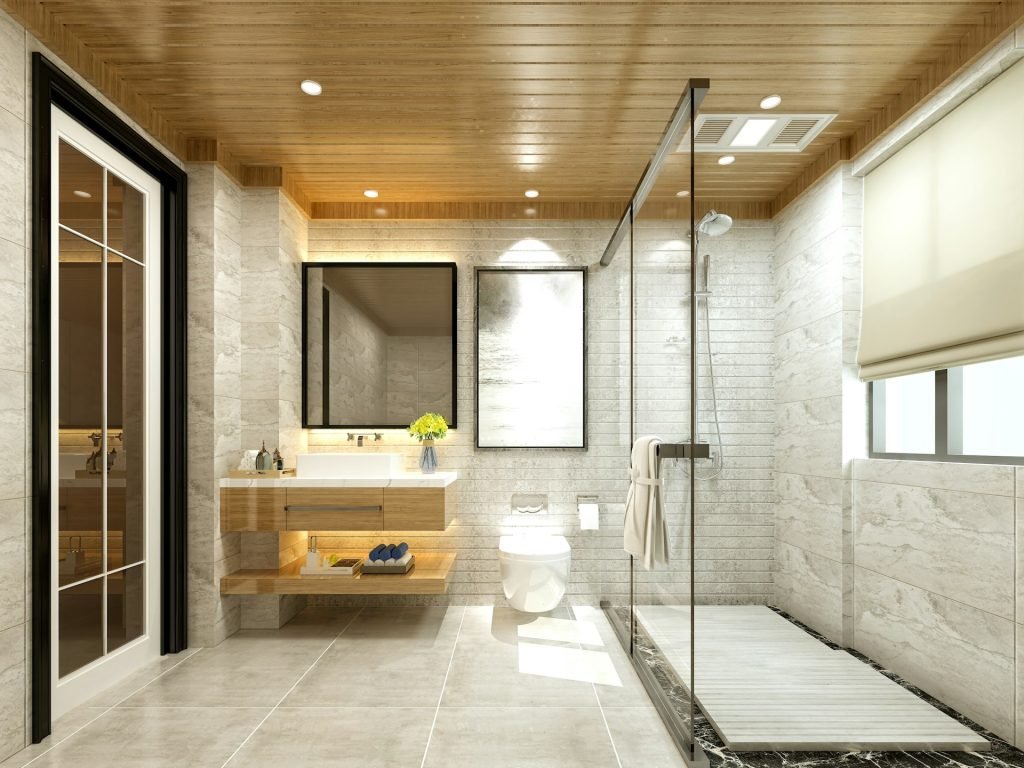
A ceiling-mounted shower arm can give your bathroom a clean, modern look while freeing up wall space. It’s a popular choice in walk-in showers and wet room styles because everything flows from above. But just like any part of your bathroom, it can sometimes need a bit of attention. When it starts acting up, things like broken fittings, leaks, or low water pressure can mess with your routine quickly. You might not notice a problem straight away. A slow drip, a strange noise, or water changing direction might seem minor at first. But over time, these little things can lead to bigger issues, especially when ceilings or wall tiles get involved. If you’ve had to jump out of the way of a sideways spray or clean up water spots that keep showing up, chances are something isn’t right up top. Common Issues With Ceiling-Mounted Shower Arms Ceiling-mounted arms usually don’t get much attention unless something goes obviously wrong. Because they’re out of reach, it’s easy to miss signs of wear or damage. That’s why small problems can get worse without much warning. Knowing what to look for helps a lot. Here are some clear signs that your ceiling-mounted shower arm might need more than a quick wipe: – Leaks around the ceiling plate Water running from the ceiling or dripping down the walls often means the fitting isn’t sealed properly, or something behind the surface is cracked. Over time, this kind of leak can cause bubbling paint, mould, or soft spots in your ceiling plaster. – Loose fittings or joints If the shower arm wobbles when you move it or gets bumped easily, it might be coming loose inside the ceiling. Even a small shift can change how the water flows and start affecting surface tiles, linings, or hidden supports. – Corrosion or discolouration If you spot rust marks, powdery buildup, or greenish stains on the arm or around the fitting, the metal may be breaking down. That kind of wear usually means moisture is sitting where it shouldn’t be and may be affecting the inside of the fitting too. – Low or patchy water pressure If the water drops out randomly or loses strength, it could mean a blockage or internal restrictions. This often comes from mineral buildup or debris inside the pipe. It doesn’t just feel annoying, it can signal issues developing deeper in the system. These problems often trick people into thinking they can patch it with a quick DIY job. Some try tightening the fitting, sealing it with silicone, or even taping over visible leaks. But when damage is behind the ceiling or inside the pipe, these fixes never last. It’s worth bringing in someone who knows what they’re doing and can inspect it properly. Why Seek Professional Help? It might seem easy to fix little issues with a ceiling-mounted shower arm yourself, but there’s more going on up there than you can see. Trying to handle things without experience can lead to bigger damage and even risk your safety. Here are a few reasons to leave it to someone who deals with this kind of thing all the time: – Electrical risks Bathroom ceilings often have lights or electrical wiring quite close to water pipes. If water starts leaking into those areas, it becomes a safety hazard. You don’t want to be removing parts and poking around without knowing what’s laid behind the ceiling. – Hidden plumbing and ceiling structure The plumbing that feeds your ceiling arm usually sits inside roof cavities. Fixing or replacing these parts involves cutting into the ceiling or navigating frame supports. One wrong move could break tiles, crack plaster, or bend pipes, which adds more work and cost. – Get it fixed for the long haul A trained plumber or technician will figure out exactly what’s wrong, down to the fitting and support bracket. They’ll replace worn parts, use proper sealing methods, and make sure the shower head is properly aligned and secured so it works well long term. To give a simple example, someone might notice a bit of movement in the shower arm and try to tighten it from the outside using a wrench. But overtightening can strip threads or crack the pipe it connects to, which then forces a major ceiling repair. Getting someone in early avoids all of that. If things don’t look or feel right, it’s best not to wait. Early signs signal brewing issues, and fixing it now can help you keep the rest of your bathroom in better shape. Regular Maintenance Tips for Ceiling Shower Arms With ceiling shower arms being out of reach, most people skip them during regular cleaning. But ignoring them only makes it easier for problems to grow unnoticed. Simple habits and quick inspections now and then can make a big difference and even save you time and money later on. Here are a few ways to make sure everything stays in good shape: – Wipe the exterior with a cloth every few weeks to stop grime or calcium from settling in and building up. – If you live in a hard water area, mix white vinegar with water and use a soft brush to clean around threads. Do this once a month to prevent scale from forming. – Glance up at the ceiling just above the shower now and then. If you notice light rings, drooping paint, or patchy marks, it might be moisture seeping from within. – Monitor water pressure from time to time. If your shower flow starts to weaken or comes out unevenly, it might mean there’s some blockage in the arm. – Listen for dripping sounds from above after a shower. Those quiet noises can sometimes be water collecting or leaking inside the ceiling area. These checks don’t need to be complicated or time-consuming. Just build them into your normal bathroom clean-up routine so nothing goes unnoticed. The choice of cleaning products also matters. Strong chemicals or scourers can wear down finishes fast
Professional Solutions for Deep Tub Installation in Australia
Deep inset bathtubs are becoming a go-to upgrade for homeowners who want a relaxing, resort-like feel in the bathroom without turning the whole room upside down. These tubs sit lower into the ground or are framed within a built-in surround, offering a snug and luxurious soak. With more people looking to create quiet zones in their busy homes, it’s no surprise deep tubs are now more popular than ever. Apart from their calm and comfy vibe, they’ve got a tidy, built-in look that makes the bathroom feel more polished. And they don’t just look good. Deep inset bathtubs can be easier to clean around, give better water depth for soaking, and even make better use of floor space. There’s a bit to think about before getting one installed, and we’re going to walk through what matters, starting with how to choose the right tub for your space. Selecting the Right Deep Inset Bathtub Not all deep inset tubs are the same. Finding the one that works best for your bathroom comes down to a few key things. Before making a decision, it’s helpful to take a step back and think about how the tub will be used, who’ll be using it, and how much room is actually available. Here’s what to keep in mind: – Size matters: Measure your bathroom layout carefully, especially the length, width, and the area near existing plumbing. Some deep inset tubs need more support underneath, so the floor needs to be checked properly too. – Material choices: Acrylic is lightweight and easy to clean, while stone-look or enamelled steel adds a strong, modern feel. Some might prefer stone for the texture, but it’s heavier and pricier. Consider weight, durability, and maintenance when picking. – Design styles: From clean-lined minimal options to more sculpted or traditional shapes, deep inset tubs come in a surprising range. Choose something that feels good to use and looks right with the rest of your bathroom fixtures. – Functionality and features: Some options come with features like headrests, arm handles or textured bases to stop slipping. A simple design might save money upfront while still giving a deep soak. – Overall aesthetic: It helps to picture how the tub will sit with the tiles, vanity, lighting, and toilet. Matching tones or going for contrast both work, as long as it feels balanced. For example, someone with a smaller ensuite might go for a rectangular acrylic inset tub that runs neatly along the wall, saving space but still giving that deep, soaking feeling after a long day. Every bathroom’s different, so it helps to get some advice when you’re unsure. But understanding the basics goes a long way in making a smart choice that you’ll enjoy for years ahead. Once the right style and fit are sorted, it’s time to think about how installation works and what to expect along the way. Installation Process: What to Expect with Deep Inset Tubs Getting a deep inset bathtub into place takes more than just picking out a nice design. Because this style fits into a cavity or built-up surround, the planning and prep needs to be well thought out. If it’s not done right from the start, you could run into issues later with movement, leaks or surface damage. Before anything gets delivered, measurements should be double-checked. That includes the outer dimensions of the tub, clearance space for plumbing, and whether the floor can support additional weight. Waterproofing and drainage also need proper planning, especially if you’re swapping it into a bathroom that wasn’t built for that type of unit. Next comes the actual install. This usually involves: – Removing old fixtures and prepping the space – Framing out a secure base to hold the tub (if flush-mounted) – Installing and testing plumbing connections – Sealing the tub in place and securing with supports – Finishing off with tiling, caulking, and trim as needed Some jobs might hit a few speed bumps along the way. For example, older houses can have uneven floors or outdated piping that needs updating before installation can even start. That’s why it’s always safer to have a professional on-site. They’ll spot those hiccups early and deal with them before anything becomes a problem. It’s also important to give the tub time to settle properly before using it, so seals and frames have a chance to set. Cleaning and Caring for Deep Inset Bathtubs Once the tub’s in and ready, it pays to keep it clean and in good nick. A little regular care goes a long way in keeping it looking sharp and working well for years. The surface and the surround both need attention, so don’t skip either. Here’s a simple maintenance routine: – Wipe it down with a soft cloth and mild cleaner after use to stop grime from building up – Use non-abrasive products. Scrappy sponges can dull or scratch the finish, especially with acrylic or enamel coatings – Check the sealant and edges every few months to catch any signs of wear or cracking – If you spot any discolouration, use a diluted vinegar mix or soap-based solution, depending on the tub material – Avoid using bath salts or oils without checking that they’re safe for your tub’s surface For more stubborn build-up, applying a paste of bicarbonate soda and gently scrubbing with a soft cloth can help, though always test in a hidden corner first. Once a year, it’s smart to have a full check-up of fixtures, drains, and surrounding tiles to keep mould and hidden water damage at bay. How Deep Tubs Can Boost Your Bathroom Design A deep inset bathtub doesn’t just offer added comfort. It can do a lot for the long-term look and feel of the room. Whether you’re doing a full bathroom revamp or just updating one area, this feature can become the centrepiece and shift the tone completely. One of the best things about this type of tub is how it blends into the layout. It doesn’t
Professional Solutions for Wall-Mounted Units in Melbourne Homes
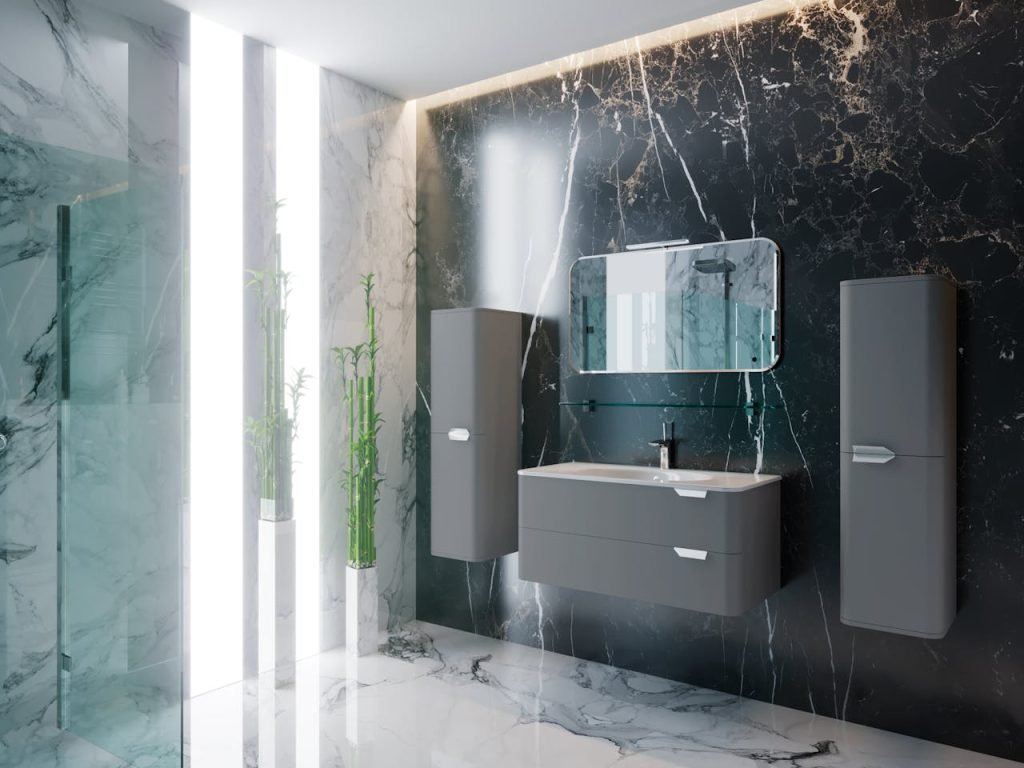
Wall-mounted bathroom units have been gaining ground in home renovations for a while now. Whether you’re updating a main bathroom or working with a smaller en suite, these sleek, space-saving units give you more floor visibility and a cleaner layout. In busy homes, that added bit of room underneath the vanity can be just enough to make cleaning easier and help the whole space feel better organised. They also free up room for items like baskets or stools without making the area look crowded. Aside from the practical gains, wall-hung vanities are a go-to for design-driven spaces. They lend a modern vibe without being over the top and easily complement most bathroom styles. Whether it’s a natural oak look, a sharp matte black finish, or something completely custom, they let you shape the space how you want. Most importantly, they don’t just look good—they play a big role in layout planning and how people move around inside the room. Types Of Wall-Hung Vanities When people think of a wall-hung vanity, they often picture a slim, floating cabinet with a basin on top. While that’s a popular option, you’re not limited to just one style. There’s a wide range out there, from compact setups perfect for powder rooms to larger double vanities that work well in main bathrooms with more volume. Knowing your options upfront can help narrow down what fits best in your space both style-wise and functionality-wise. Here’s a quick breakdown of some common types and finishes you’ll see: – Floating vanities: These are the most recognisable style in wall-mounted designs. They create an airy feel and make the bathroom look bigger by showing off more of the floor. – Integrated basin designs: These combine the top and basin into one seamless surface. They’re great for reducing mess and give off a smooth, modern finish. – Minimalist storage units: Think slim drawers or push-to-open doors without handles. Good for small rooms or those aiming for a very clean, simple style. – Timber-look or natural finishes: These bring some warmth to the area and balance out cold finishes like tiling and metal tapware. – Custom units: For bathrooms with specific measurements or awkward layouts, a custom-built vanity can make full use of the wall space and give a better result overall. When deciding which type fits your bathroom setup, think about things like layout, use, and storage needs. For example, a family bathroom might need more drawer depth and an easy-to-clean top, while a guest toilet might benefit from something lightweight that doesn’t overpower the space. An example of this in action: One homeowner swapped out an old freestanding cabinet for a timber-look wall-hung unit paired with a round mirror. What was once a cramped area now feels much lighter with room underneath for storage baskets, and cleaning the floor takes half the time. It proves that even something as simple as lifting the vanity off the ground can create a noticeable change in the right hands. Installation Guidelines For Wall-Mounted Units Getting a wall-mounted vanity installed properly starts well before the drill comes out. Careful measuring and planning helps everything go smoother, especially if you’re working with a small layout or unique wall construction. Begin by checking the wall where the vanity will go. Make sure it can support mounting brackets and the weight of the unit itself, including any extras like stone tops or ceramic basins. One major element to look at is the height you want the vanity to sit at. Most people go for around 850mm to 900mm from floor to benchtop, but it really depends on who’ll be using it. Taller users might want it slightly higher to avoid bending too far, especially if it’s the main daily-use bathroom. The next big step is proper wall preparation. For tiled surfaces, you’ll need to drill through with the correct bit and use anchors that suit the wall type. Timber studs behind plasterboard are an ideal spot for brackets, giving strong support. If the wall doesn’t have studs where brackets are needed, a timber noggin may need to be added before sheeting goes back on. Some tools and equipment involved in installation usually include: – Stud finder – Drill and level – Fixing anchors and wall plugs – Measuring tape – Pencil for marking – Silicone and sealant gun Though it looks simple from the outside, proper installation requires a good understanding of how weight and plumbing work in wall setups. For instance, mounting a heavy unit on an old plaster wall without reinforcing it first can lead to sagging or even collapse. Most homeowners choose to get help from a licensed professional who will make sure the pipework lines up, the unit stays secure, and nothing leaks over time. Maintaining Your Wall-Hung Vanity Once your unit is fully installed, taking care of it is pretty straightforward but still needs attention over time. Start with regular cleaning, both inside and out. Use a damp cloth with mild soap to wipe down cabinet faces, drawer fronts, and the benchtop. Avoid abrasive sponges, as they can leave marks, especially on finishes like matte or gloss laminates. Water can be the main troublemaker when it comes to keeping vanities in top shape. Even though most wall-mounted units are elevated away from splashes on the ground, sitting water on the bench or near joins can eventually cause swelling or damage. Make it a habit to wipe down any soaked spots straight away, especially around the basin and tapware. You’ll also want to keep an eye on fittings and brackets every few months. If the drawers feel loose or the vanity starts to lean slightly forward, it could be a sign that the fixings behind the wall need checking. A small issue left too long can turn into a much bigger repair. A quick checklist to stay on top of things: – Wipe down the top surface daily to prevent soap residue and water spots – Use a dry cloth on
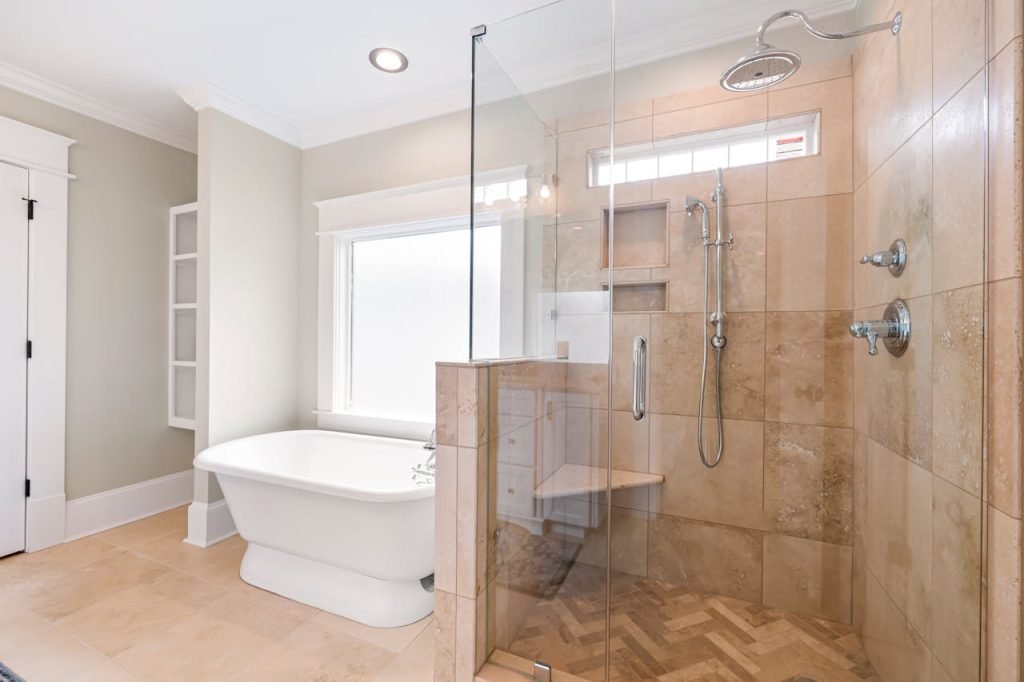
Making the Most of Your Modern Bath-Shower Combination

A modern bath and shower combo is a smart way to get the best of both worlds. You don’t have to choose between a quick rinse or soaking in the tub. This setup gives you flexibility, comfort, and allows you to make better use of your bathroom every day. Whether you’re updating an old space or designing a new one, it works well for homes with busy routines or multi-person households. The design of these combos is also a big part of their appeal. With the right layout and finishes, the bath and shower blend into a single space that looks sleek and feels practical. Think glass panel doors, soft taps, and built-in nooks for storage. And because it saves space without giving up any function, this type of setup is ideal for both smaller bathrooms and large ones where you want a clean, modern look. Choosing The Right Bath-Shower Combo Before you buy anything, it’s good to know what kind of options are out there. Bath-shower combos come in a few different styles, all suited to different needs and spaces. Some units are straight-sided, which work well in compact areas. Others are curved or L-shaped, offering a bit more room to move around while you shower. Then there are freestanding options that add a bit of luxury, if you’ve got the floor space for it. Here are a few points to think about when picking the right style for your bathroom: – Room dimensions – A long, narrow bathroom might suit a straight tub setup, while corner units fit snugly in tight areas – User needs – Think about who’s using it. A unit with a low step-in edge might suit older adults or kids – Plumbing location – Where your existing tapware and drainage are matters, as moving pipes adds time and cost – Glass type and screens – Fixed glass panels offer a minimalist look, while sliding or hinged screens give more flexibility – Storage add-ons – Some combos come with ledges or moulded shelves, which help reduce clutter You also want to make sure the combo fits with your overall bathroom style. If the rest of your space has matte black fixtures, then a white rectangular combo with chrome trim might feel out of place. Matching aesthetics will keep everything feeling cohesive. One homeowner we worked with had a soft grey bathroom with timber accents, so we balanced it out with a combo that had matte tapware, a clear screen, and a lightly textured acrylic bath – simple and clean, but tied in well with the rest of the space. A bath-shower combo isn’t just about fitting a tub and shower in one spot. It’s about creating something that suits your exact routine, looks great, and won’t feel dated in a year or two. Buyer regret can come fast when the layout cramps your movement, or worse, makes water splash outside with every use. Planning well upfront goes a long way. Installation Tips And Tricks Getting the installation right is just as important as picking the right unit. A bath-shower combo should function smoothly and feel solid from day one. That means proper planning before the work begins. Many common problems, like slow drainage or warped screens, usually happen when the prep work hasn’t been done properly. Before the install starts, there are a few things we usually double-check with our clients: 1. Measure the space, not just floor size but also height between floor and ceiling 2. Check your home’s plumbing pressure and water direction 3. Confirm what’s behind the walls, to avoid trouble when mounting screens or handles 4. Choose the right support surface — the floor needs to bear the weight of the tub, water, and person Once prep is done, the actual install follows these broad steps: – Frame and level the bath before sealing it in – Connect drainage and test water flow and pressure – Install screen or glass partition and secure with weatherproof seals – Apply silicone neatly around edges and corners Some combos have pre-built panels, others need more detailed joinery. If your bath-shower combo has extras like a ledge or seat moulding, it’s good to allow for added sealant and support. Poor ventilation is another roadblock we often see. If steam builds up without proper air flow out, it can affect silicone seals over time and cause mildew near joints or behind glass. Installing or upgrading an exhaust fan can make a big difference here, especially in small or enclosed bathrooms. Trying to cut corners might save you time upfront but ends up adding more repairs down the line. It’s always a good idea to have a professional take a proper look before anything gets fitted permanently. That way you know it’s done right from the start. Maximising Space And Utility When space is tight, a well-designed bath-shower combo can really help open things up. One of the biggest benefits is how these setups make use of vertical and horizontal surfaces, giving you more room to breathe while still keeping everything you need within reach. Even in rooms that feel snug, there’s often a smart way to get everything working together. Start with layout. If your bathroom feels narrow, place the combo along the longer wall to reduce crowding. For square-shaped spaces, a corner or L-shaped combo can tuck in neatly while preserving more open floor. The screen you choose can also make a difference. Frameless or sliding options tend to keep things visually light, which helps the room feel more open. Built-in storage options are another way to improve functionality. A few ideas worth thinking about: – Recessed wall niches to hold your shampoo, soap and razors, keeping clutter off ledges – Bath panels with hidden compartments, great for spare towels or extra products – Extendable shower rails or hooks for loofahs and brushes without overloading the screen – Foldable seating for those who want added comfort without taking up room – Overhead racks or
Professional Solutions for Corner Bath Installation Challenges
Small corner bathtubs have started to gain more attention lately, and it’s easy to see why. They’re great when you’re trying to make the most of a tight bathroom layout without missing out on comfort. These baths tuck neatly into a corner and help free up space for other fittings, making a smaller room feel less crowded. Whether you’re dealing with a compact ensuite or updating a family bath, choosing a small corner model can bring a smart and stylish upgrade without going overboard on space or cost. But fitting one properly isn’t always as straightforward as it might seem. Between planning the layout, tackling plumbing, and making sure it all sits evenly in the corner, there can be a bunch of small hiccups along the way. Some mistakes can be fixed quickly, others might lead to ongoing water damage or uneven fittings over time. That’s why it helps to plan it right from the start and lean on professionals who install these more often. Choosing The Right Corner Bathtub If space is limited but comfort still matters, picking the right style of corner bath can make all the difference. There are a few types available that work well in small areas, and they each suit different needs. Some look more rectangular and blend easily with a modern layout, while others have a rounded front that gives a softer, spa-like feel. Here are a few common types of small corner bathtubs: – Back-to-wall corner baths: These sit flat against two walls, tucking neatly into a corner. Good option if you’re after a bath with a built-in look. – Triangle-shaped baths: These offer more soaking room inside without using up extra floor space. Great for homes where relaxing in the tub matters as much as saving space. – Shower-bath combos: These often mix straight edges with a curved side for comfort, making them ideal if you want a versatile setup with overhead shower use. When choosing a corner bath, it’s smart to measure your room first, including ceiling height and any window placements that might get in the way. Also think about who’s using the bath. A larger adult might find some shapes more comfortable than others. For example, someone renovating their ensuite may prefer a deep but short triangle bath that lets them enjoy a full soak without needing a lot of floor space. It’s all about matching the bath to the room and lifestyle. Material also plays a part. Acrylic tubs are lighter and easier to install. But if you’re after something that holds heat longer or feels more solid underfoot, you might lean towards something like stone or reinforced steel designs. Pre-Installation Preparation Once the bathtub is picked, the next step is preparing the space to suit the design. Rushing through this bit can lead to problems later, so lining everything up properly will save a lot of headaches. Start with proper measurements: – Map out exactly where the tub will sit – Make sure doors and drawers nearby will still open freely – Watch for windows, lights or vents that might be impacted once the bath is in place Drainage is another thing that must line up. A corner bath might need the waste outlet to be shifted a little, depending on the type of bath you’ve chosen. If drains, taps or pipes aren’t where they should be, the bath won’t sit neatly and could even cause pooling water or leaks down the track. Wall checks are also worth doing. If the walls are slightly uneven or poorly sealed, you’re looking at gaps where water can sneak through. Adding wall backing or adjusting the frame ahead of time could make installation smoother and reduce the risk of needing repairs later. Prepping the space does take a little effort, but it’s what helps the bath sit properly and work well. Skipping these steps can lead to misfitting, unnecessary bends in plumbing, or even worse — having to pull the whole unit out again. Better to take the time now and get it right the first go. Common Installation Challenges And How To Manage Them Once you’ve done the planning and prepped the space, the next step is fitting the bath and that’s where a few common issues can crop up. One of the biggest is dealing with uneven floors or crooked walls. It’s rare to find perfect corners in older homes, and even newer builds can have slight variations. If the corner isn’t square, the bath might not sit flush against the walls, which can lead to gaps that allow water to sneak behind. Tight spaces also make installation harder. If you’ve picked a small corner bathtub to save space, that same space can make it tough to move tools and materials in and out easily. It can also limit your access to the plumbing once the bath is in. In some cases, adjustments need to be made to the wall or skirting to get everything to line up safely and securely. Weight distribution is something people don’t always think about until the last minute. A heavy tub filled with water needs stable support. Installing it without sorting the subfloor or frame underneath can lead to shifting near the edges and cracks in the corners over time. Professionals usually use a support cradle or base that spreads the weight evenly and keeps everything in place. Another sticking point is getting a good waterproof seal. Small mistakes with caulking or sealing edges often don’t show right away but can lead to leaks down the line. It’s often better to take the time to double-check seal points, especially where the tub meets tiles or waterproof wall panels. Why Professional Installers Make A Difference Hiring skilled help isn’t just about convenience. It reduces the risk of damage and solves problems you might not even know exist until it’s too late. Professionals have seen all kinds of setups before and know how to work around tight corners, tricky wall angles and